


A lot of small businesses and large alike see Facebook’s Business Manager and groan a little on the inside. There is a lot to keep up with, and a lot of it seems pretty technical at a first glance. And since your business is likely able to accomplish most basic marketing tasks without diving too deep (or at all) into the Business Manager, it makes sense that many avoid it altogether.
If you’re not using Facebook’s Business Manager (whether intentionally or otherwise), however, you are missing out on multiple valuable marketing opportunities. While Business Manager is essential for agencies, it also has numerous benefits for businesses of all sizes that can improve the efficacy of your marketing or offer new features with new capabilities.
Whoever you are, in this article we’ll do our best to convince you that now is the time to make the leap to Facebook Business Manager, and we’ll show you how to get started.
We’ll cover what is Facebook Business Manager, how to get started in it, what the key features are, and how Facebook Business Manager will benefit your business.
There’s a lot to cover so let’s dive in!
So What Is Facebook’s Business Manager?
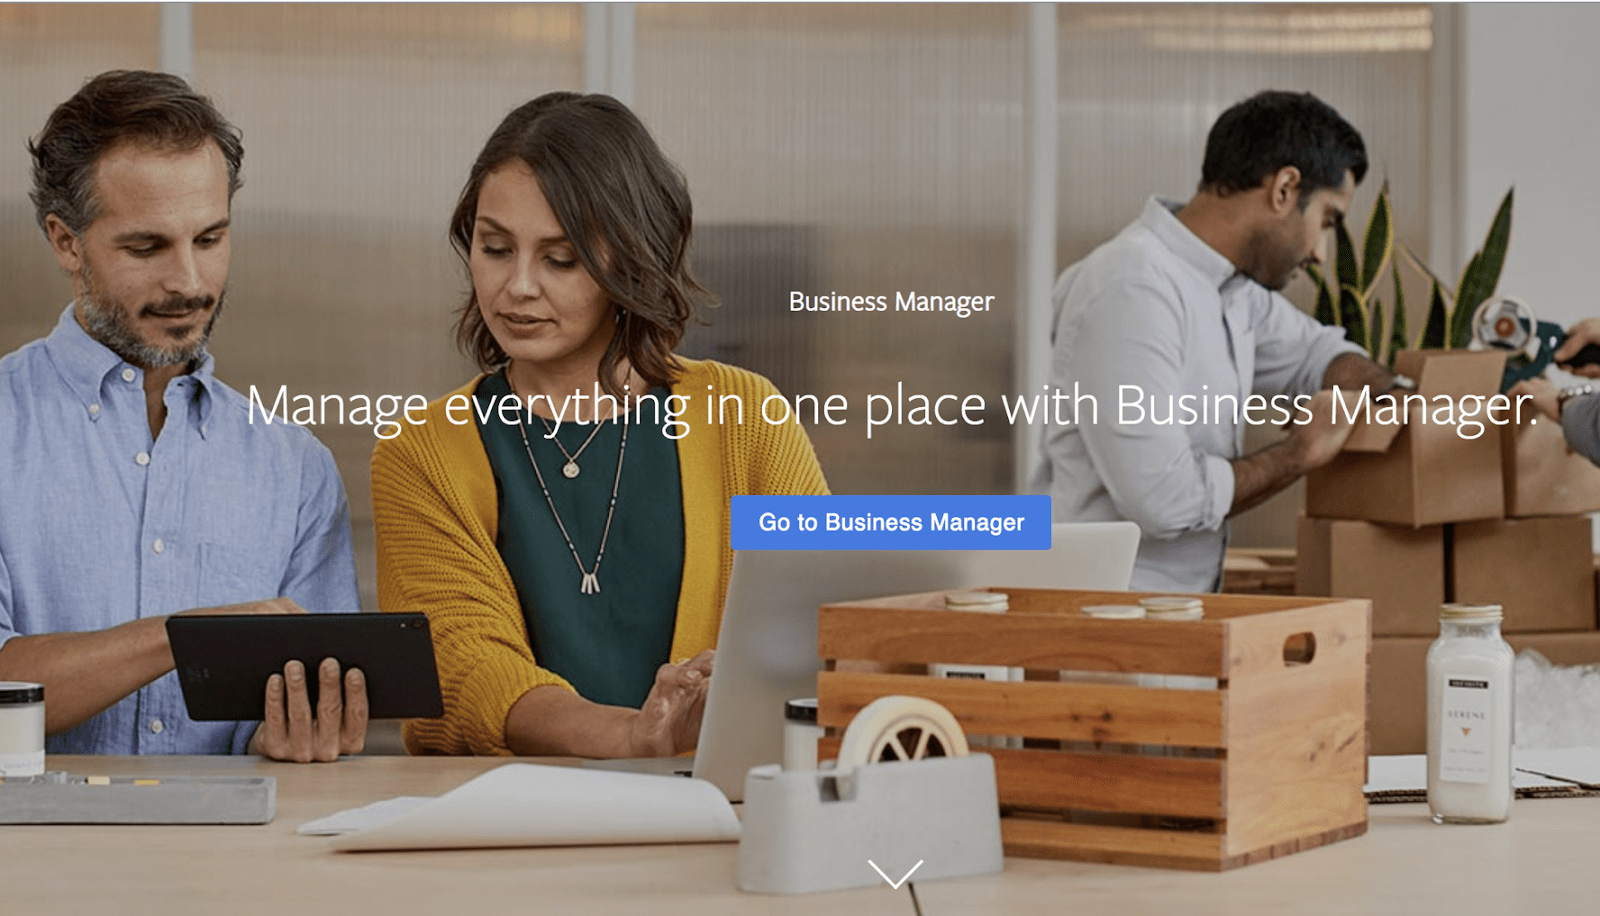
Let’s start with how Facebook themselves define the Business Manager:
Business Manager allows advertisers to manage their marketing efforts in one place and share access to assets across their team, partner agencies and vendors.”
They simplify this even further down to “manage everything in one place with Business Manager”

Historically, when Facebook advertising started out there was no need for Business Manager as the average business probably just had a couple of ad accounts and Facebook pages and a handful of employees to manage them. Facebook’s Page features were also much more limited than they are now; back then, Pages were brand new. Analytics were nothing like they are now, tracking pixels didn’t exist in the same capacity, and even features like dynamic ads from product catalogs weren’t a thing yet.
Over time, we’re seeing more businesses owning more Pages, working with more agencies, and taking advantage of more of the incredible features now available to us.
Simply put, Facebook’s Business Manager is now a fully native tool available to all Pages. It can be used to manage your ads, your Pages, connect with agencies (or, if you’re an agency, connect to clients), and take advantage of in-depth features like setting up your pixels or adjusting custom attribution windows for your Facebook Ads. Here, you can also manage billing, review brand safety concerns, manage events, create product catalogs, and store images and videos for your Pages.

If you are at your first campaigns, you might want to click here and learn how to get your Facebook ad account, Facebook page, and Business Manager ready to work. If you are ready to dig deeper into how the Facebook Business Manager works. just keep on reading.
The 2020 Guide to Facebook Business Manager
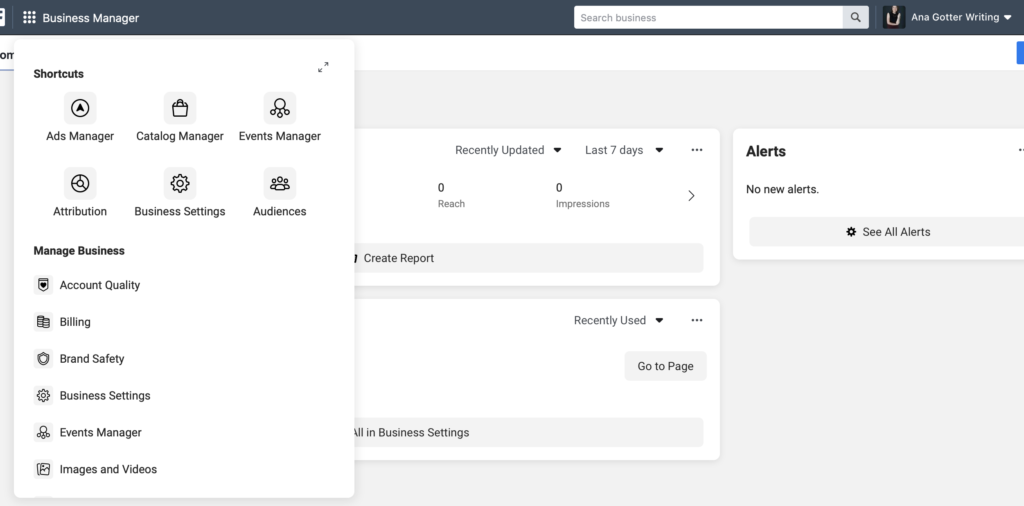
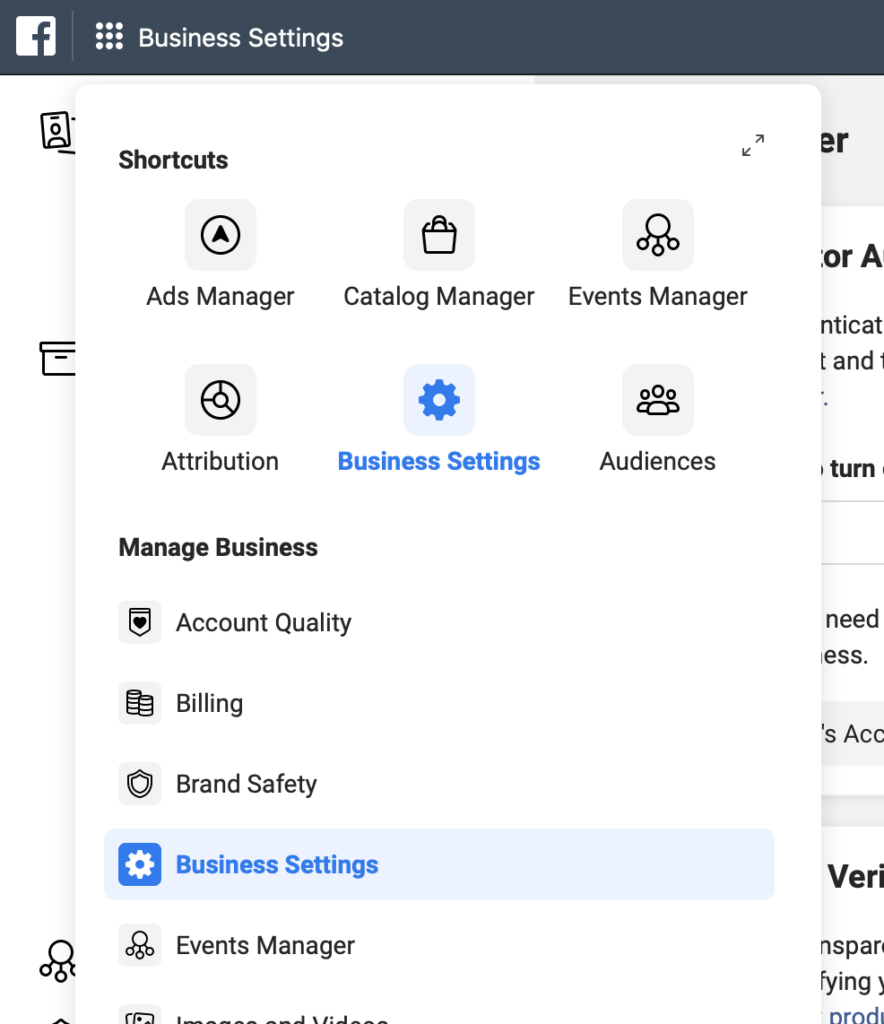
Let’s start with the lefthand menu in Facebook Business Manager and explore the options available in 2020:

There are options for the following:
- Ads Manager
- Catalog Manager
- Events Manager
- Attribution
- Business Settings
- Audiences
- Account Quality
- Billing
- Brand Safety
- Business Settings
- Images and videos
Managing all these in one place from one menu is so much easier than having them spread out across different portals, and agencies and businesses with multiple Pages can use the business manager to effortlessly manage all of their Pages or their client’s Pages and ad accounts.
At this stage you might be feeling overwhelmed by the dozens of options available but don’t worry, you don’t have to use all the tools at once, some of them won’t be used at all. Others, you may only need to access once (like to set up your tracking pixel, if no changes are needed later down the road) or may not need to access ever again.
If ever you get stuck just use the search bar across the top of your account and hey presto, it will find all your available tools, the ad campaigns, ad sets, and ads, all in one place.


Why Use Facebook Business Manager?
There are six primary reasons that you’ll want to consider using Facebook’s Business Manager. If you’re still not convinced you need the tool, let’s look at each one.
Reason #1: Most Advertisers Now Have To Use It
Practically being required to use the tool is a great reason to do so, in our humble opinion.
During the last quarter of 2018, Facebook started making Business Manager compulsory for all accounts using custom audiences created from email lists.
Any advertiser looking to maximize performance should be using email custom audiences, for example, to nurture leads or to get customers to make a repeat purchase.
Alternatively, these lists of warm audiences can be excluded from cold traffic prospecting campaigns.
Although audiences can also be created based on pixel events, these audiences only last for 180 days whereas an email audience can be used forever.
So, if you’re looking to get the most out of your advertising you’ll have to switch to Facebook Business Manager.
Reason #2: It Prevents The Need For Grey Social Media Accounts
Without Facebook Business Manager it’s difficult to separate a personal Facebook profile from the business assets that they control.
This is a recent conversation I had with an agency owner:
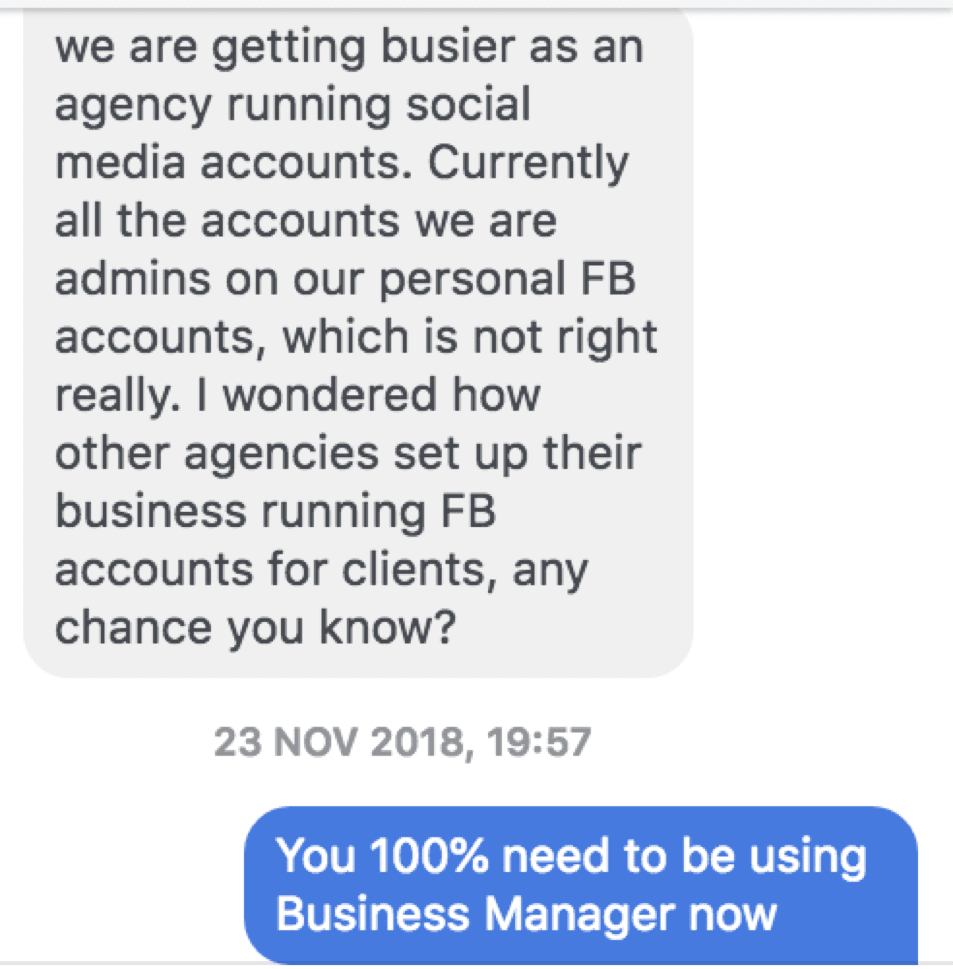

It probably happened to you too: your staff wants to keep their personal profile separate, and it gets tricky adding multiple staff to each asset.
This has resulted in companies that don’t use Business Manager creating “grey accounts” where they create a fake personal profile with a shared login for all staff.
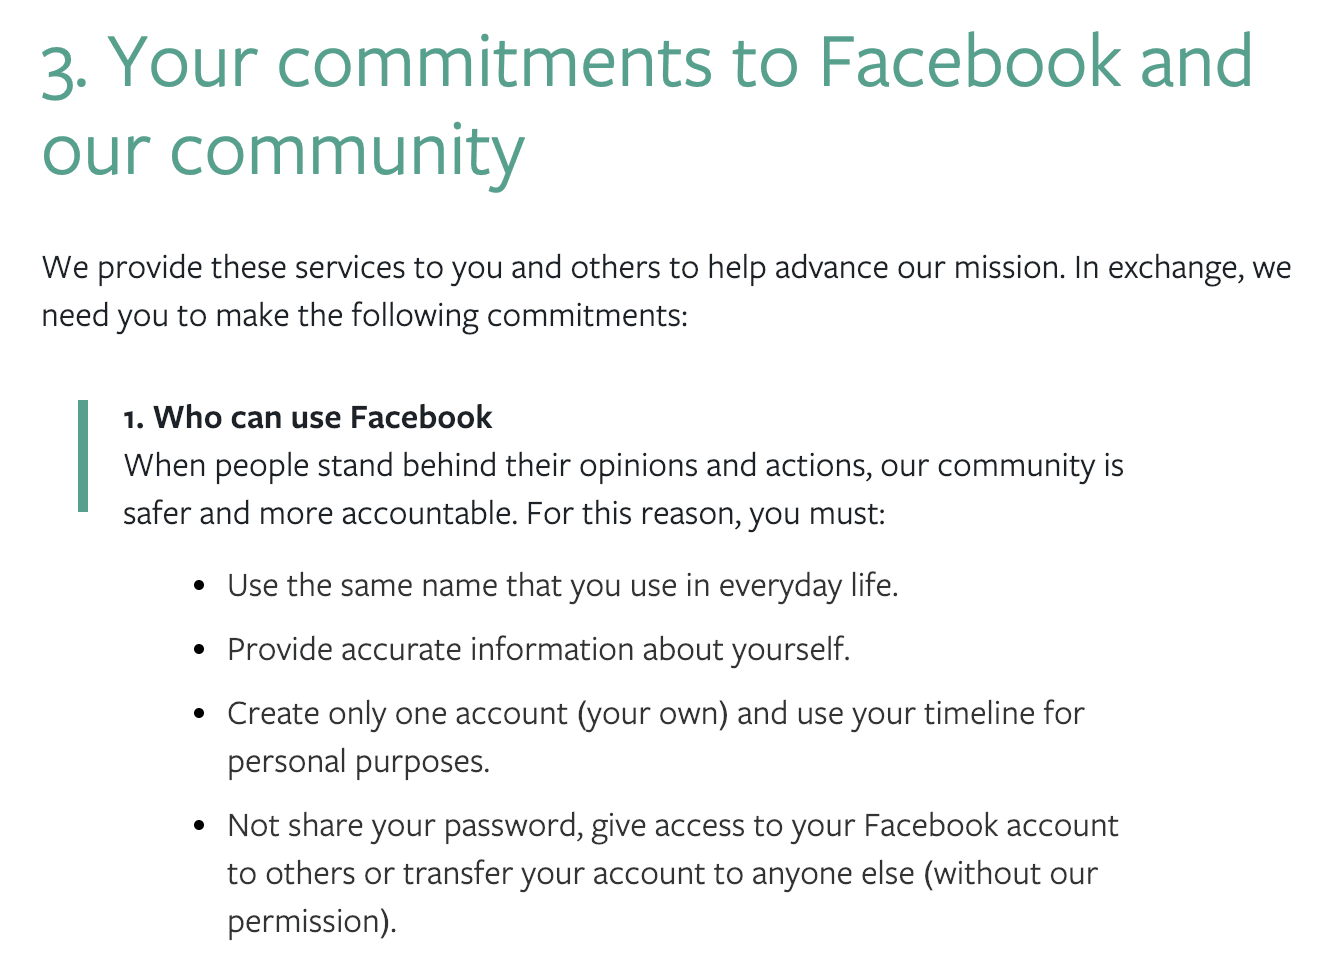
This is strictly against Facebook’s terms of service:

We have seen Facebook disable fake profiles which has blocked companies from accessing their own Facebook pages and ad accounts.
Thankfully they managed to regain access but it’s a huge risk, and one that can be easily avoided by switching to Business Manager.
Reason #3: You’ll Get Better Support From Facebook
As we mentioned in the first section, there are dozens of types of assets and tools, all of which need to integrate with each other to work properly.
If ever you have a technical issue it’s likely that the first thing Facebook business support will ask is if you’re using Business Manager.
They’re unlikely to be able to offer in-depth help unless you’re using their recommended tools.
Ask yourself a question:
Do you want to switch to Business Manager now when you can plan a smooth transition or would you rather switch in a hurry when you’re already dealing with technical issues?

Reason #4: The Sooner You Switch, The Easier It Is
If you just have a Facebook page and an ad account then importing them into Facebook Business Manager is easy. However, over time the number of assets your company holds has a habit of rapidly expanding.
Maybe you set up an Instagram account, then create a Facebook pixel, next add some new employees and so on.
Even with just a few assets, it can get complicated working out which employee needs which level of access to what assets.


In extreme cases, we’ve seen franchise businesses trying to move 100 Facebook pages, 100 ad accounts and hundreds of staff into Business Manager and it becomes a complex and time-consuming project.
If you make the switch now it’ll be far easier than making a more complicated transition in the future.
Reason #5: It’s More Secure
Marketing tends to be an industry with high staff turnover and often agencies are engaged for occasional short-term projects. Over time this can cause security risks with ex-employees still having access.
By having all assets, employees, and agencies in one portal it’s possible to do a monthly audit to ensure only the right people have the correct levels of access.
The key here is to have one member of staff in charge of Facebook Business Manager and to have them schedule a monthly audit.
Every time we take on a new client we find their employee and agency list needs a spring clean, it’s not enough to be using Business Manager you have to have to intentionally do a monthly check.
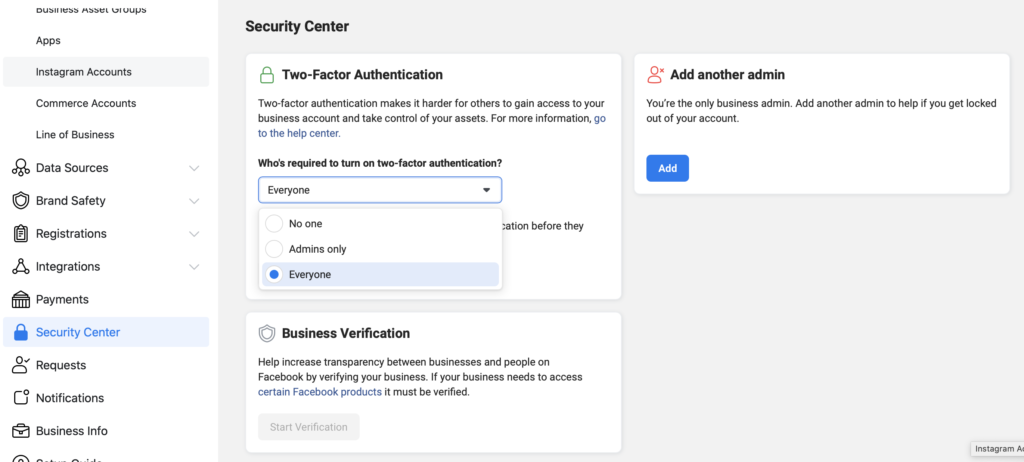
Facebook Business Manager includes a Security Centre where you can require two-factor authentication for all employees (recommended) and it will also help your auditing by letting you know if any employees are inactive.

Reason #6: It’s Free
Not only is there no charge for using Facebook Business Manager, but better still it enables you to access Enterprise-level tools which are now free for all Facebook advertisers.
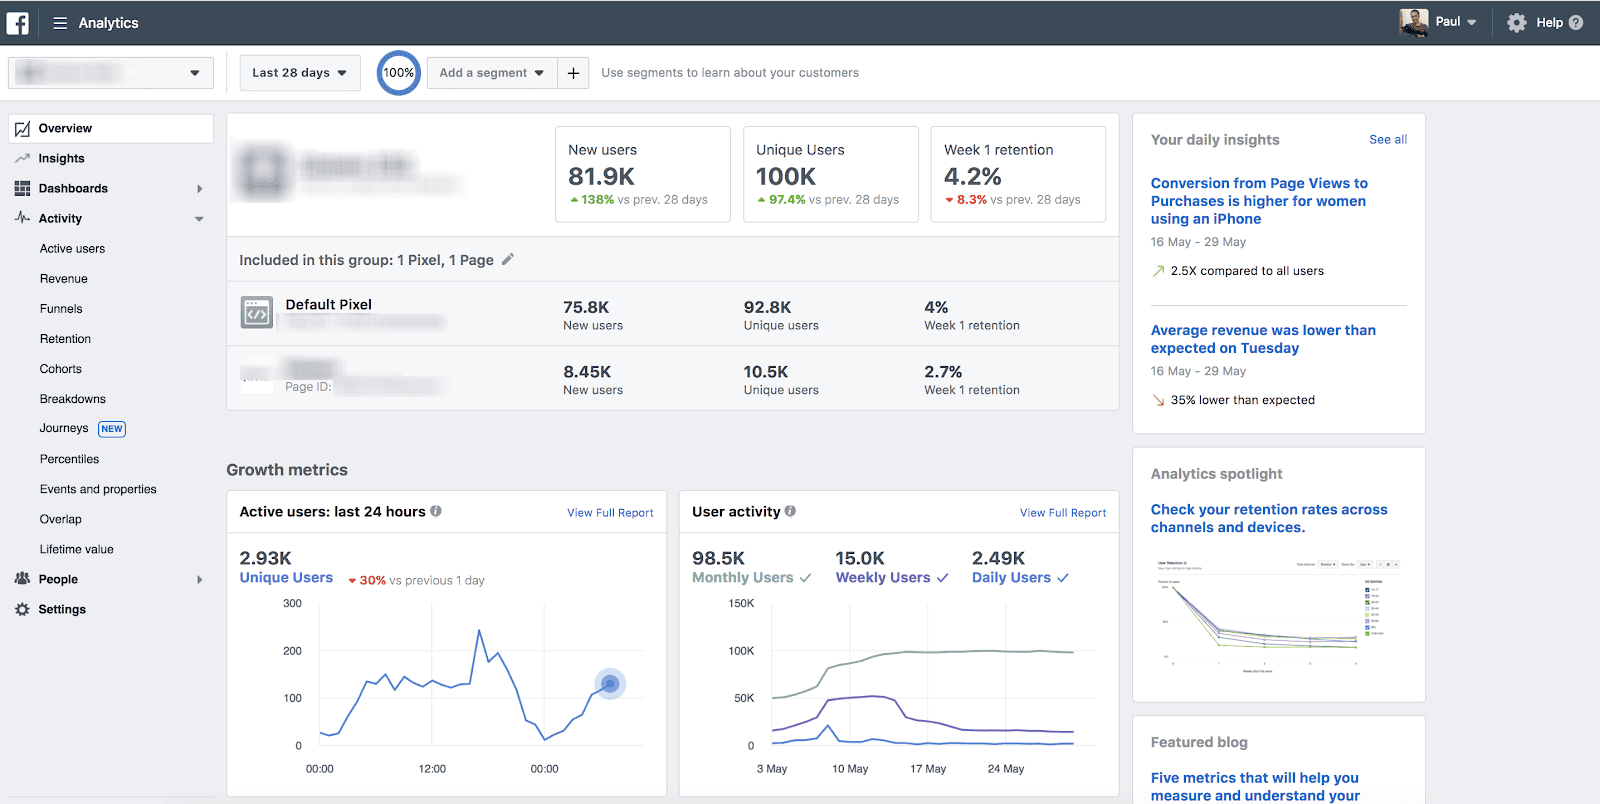
For instance, there’s the Facebook Analytics tool where you can create an Event Source Group (ESG) consisting of pixels, pages, and apps, allowing you to combine several data sources together into one analytics dashboard:

One Last Step To Success
Did we convince you that you must get started with Facebook Business Manager right now? The next section will get you started in six easy steps and show you a few tricks to maximize your advertising results.
Facebook Business Manager: How to Get Started


Simply follow the instructions in the next few sections to get your Facebook ad account, Facebook page, and Facebook Business Manager ready to start bringing in new customers in six easy steps!
Step 1: Create Your Business Manager Account
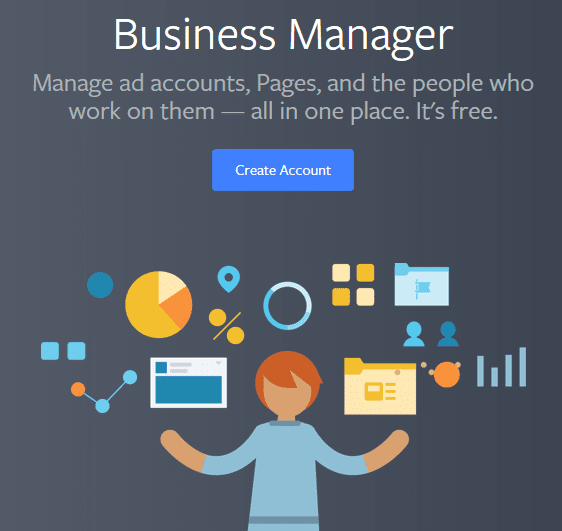
Head on over to https://business.facebook.com/ in order to set up your first business account.
Once there, you should see a big blue button that appropriately says “Create Account.” 😯

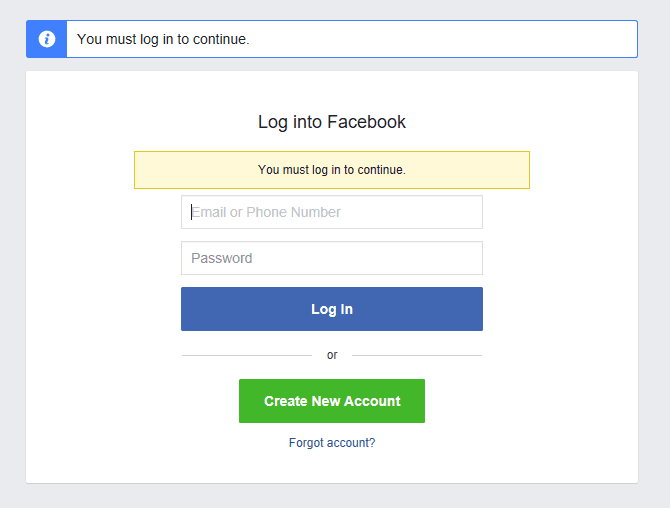
Next, it’ll have you log in to Facebook just like usual:

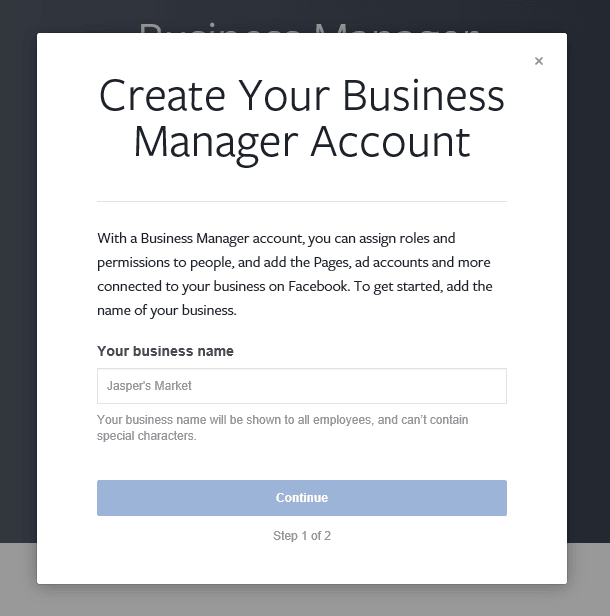
Then, create your Facebook Business Manager account by typing in your business name. This name will be visible to everyone and can’t contain any special characters (sorry, startup hipsters).

Next, create your business profile by typing in your name and email address.
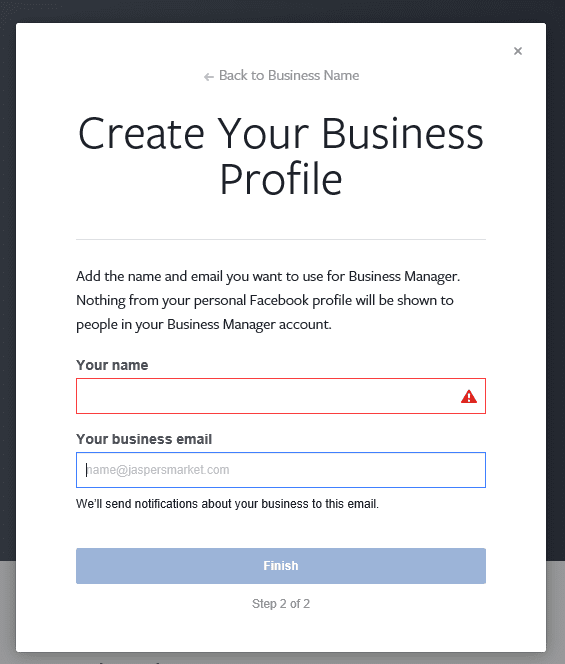

Pretty smooth sailing so far, right?!
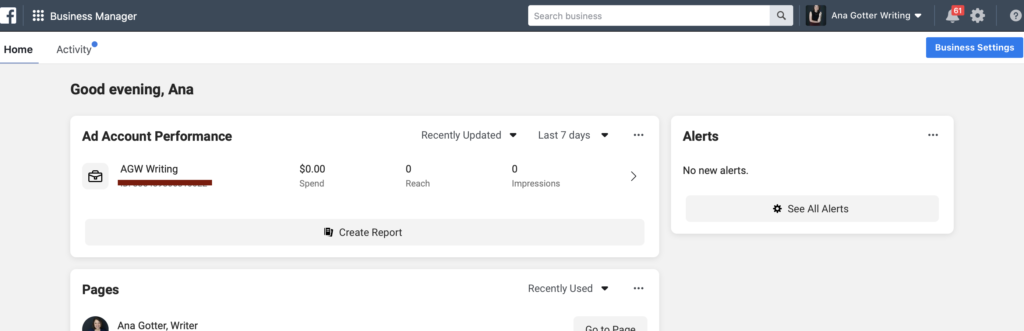
Once you signup, you are launched directly into the Business Manager app that will look something like this:
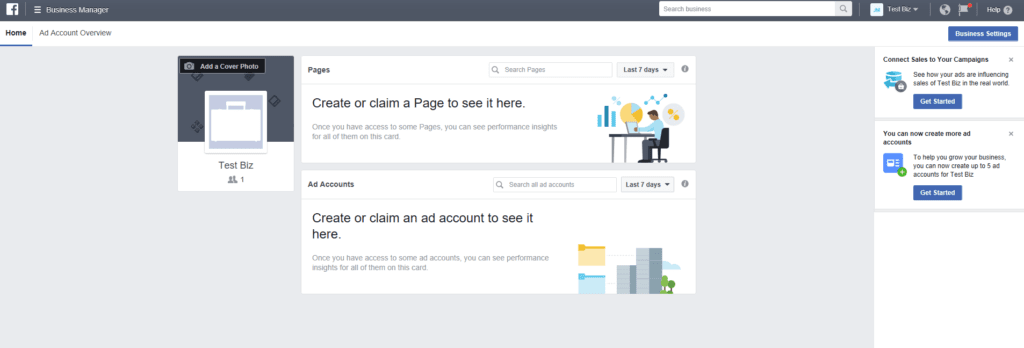

Here is your dashboard, where you can access everything about your business.
The first step they will prompt is to create or ‘claim’ your Facebook business page and ad accounts.
In the primary navigation bar, find “Business Settings” as an option.

If you already have a Facebook business page or ad account setup you should see it in the middle of the screen now.
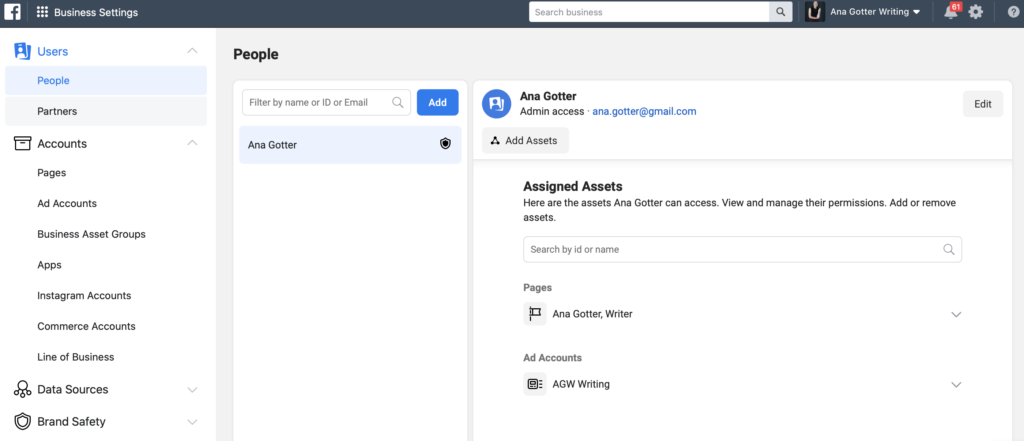

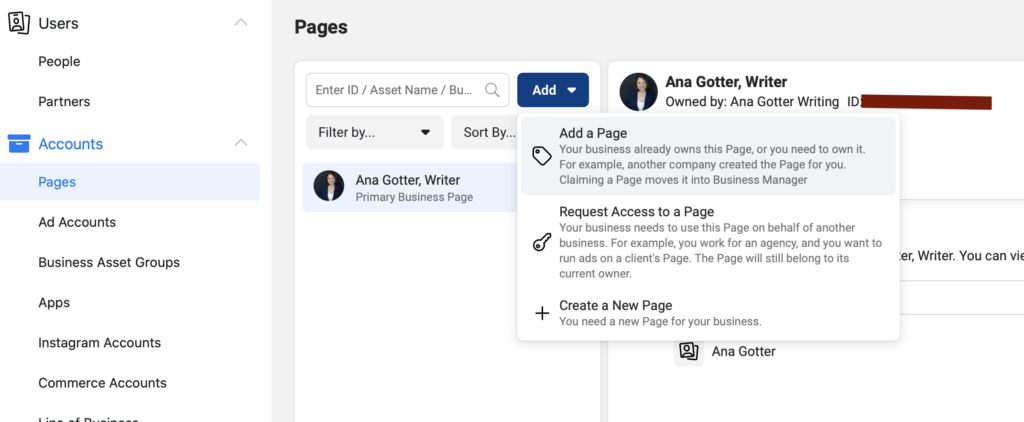
When you first set up Business Manager, you’ll be given the option to add new accounts, request access to other ad counts, and create new ad accounts. You can also claim, request access to, or create new Pages. Here, essentially, you can manage everything related to your Business Manager.
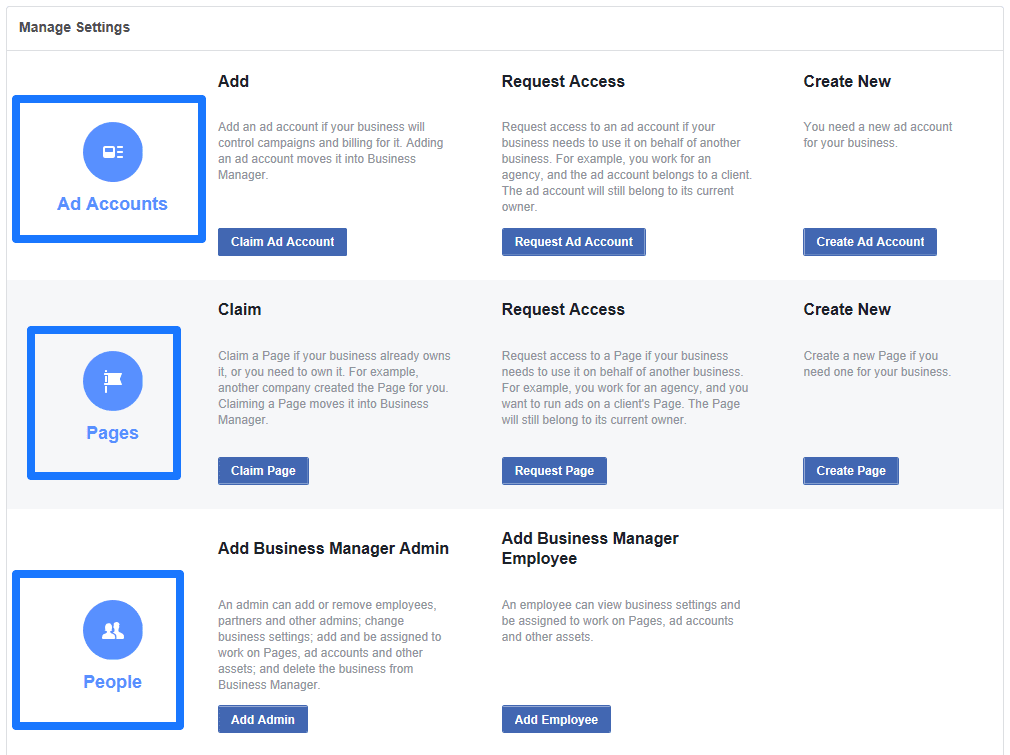

Here you can get started with ad accounts, pages, and people. They’ve simplified these options a lot, so it should be self-explanatory to see what you should be doing next (i.e. “Create Page” for first-time visitors, or “Claim Page” if you already have one up, etc.).
Simply point, click, and follow the on-screen instructions.
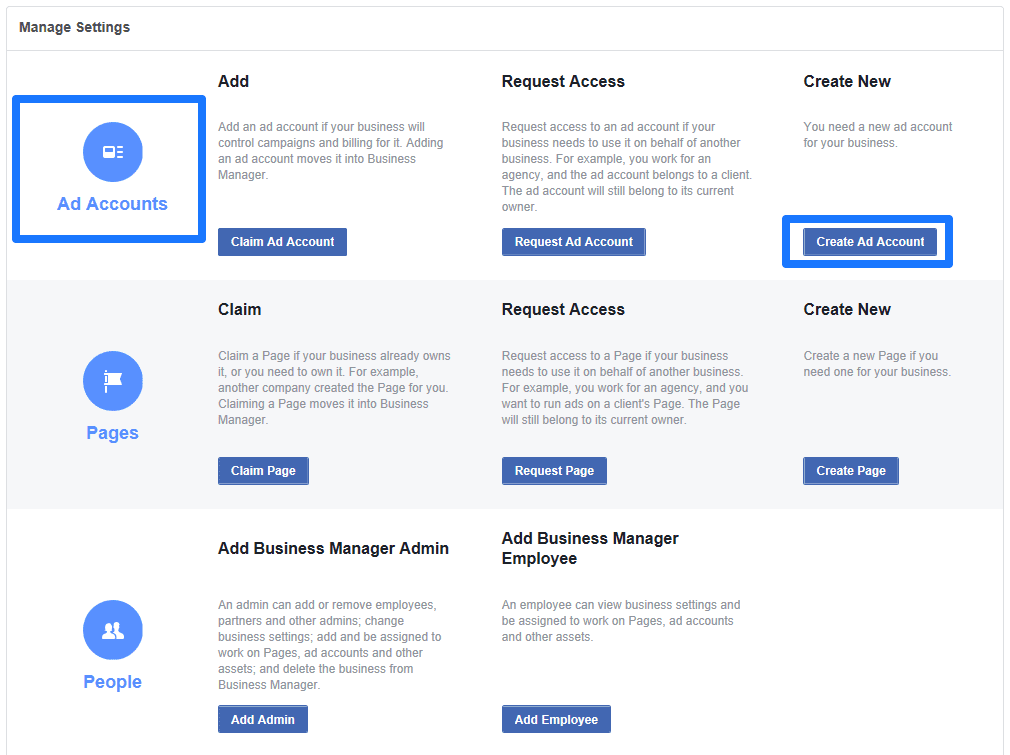
Step 2: Create an Ad Account
Now let’s create a new ad account inside the Business Manager.
The Ad Account options will be in the upper row under your Business Manager Settings. Simply look over to the right-hand side for the button that says “Create Ad Account.”
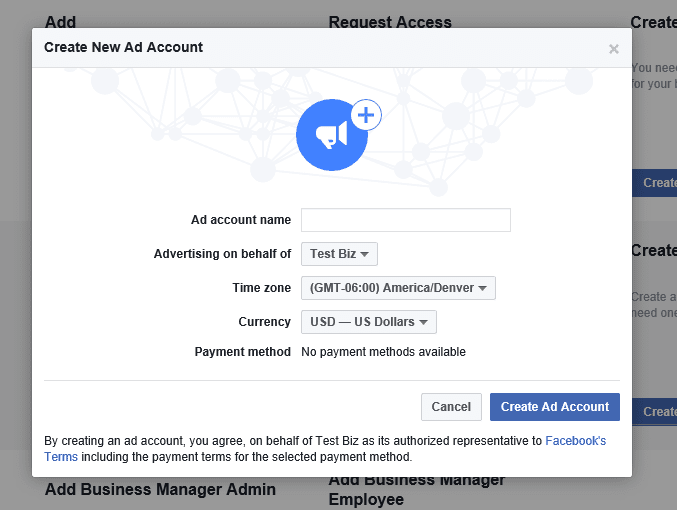
Next, it will ask you to fill in some basic information like your ad account name, what business manager profile you want to connect it to, the timezone of your business, and the currency you use:

Once you fill out your business information, select the people you want to add to this new ad account:
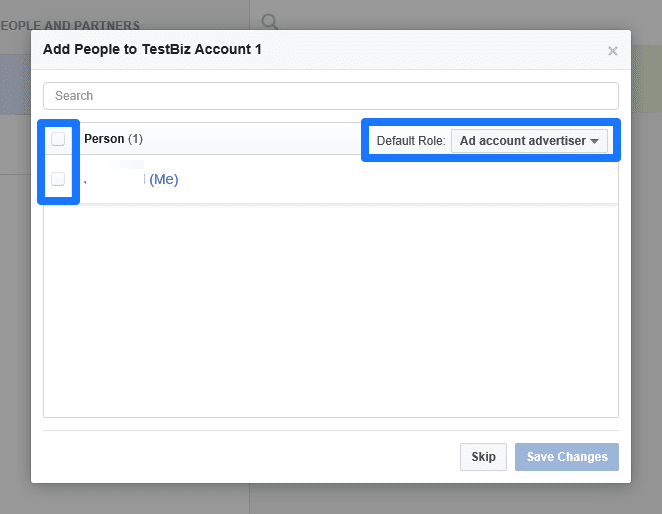

Here you can also select default roles for each individual. So that means you might want to give different access levels to one person who’s an outside vendor vs. your in-house marketing manager.
Don’t worry, you can always edit this later. We’ll also show you how to add more people (employees, admins, advertisers, and more) in the next few sections.
Once you select the initial users to add, hit “Save Changes” and your account is created like so:
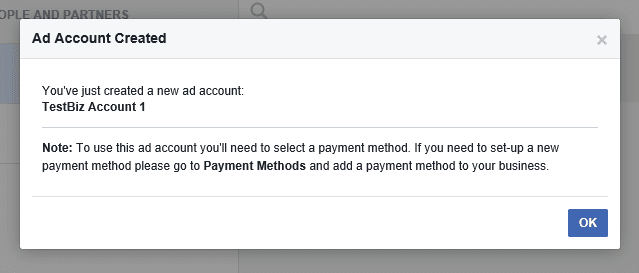

The next step is to setup a new method of payment before you can start advertising.
You should see links in the middle of the page to click and edit payment method details. Or you can look over to the upper right-hand corner to return to some of the information we just setup (like people).
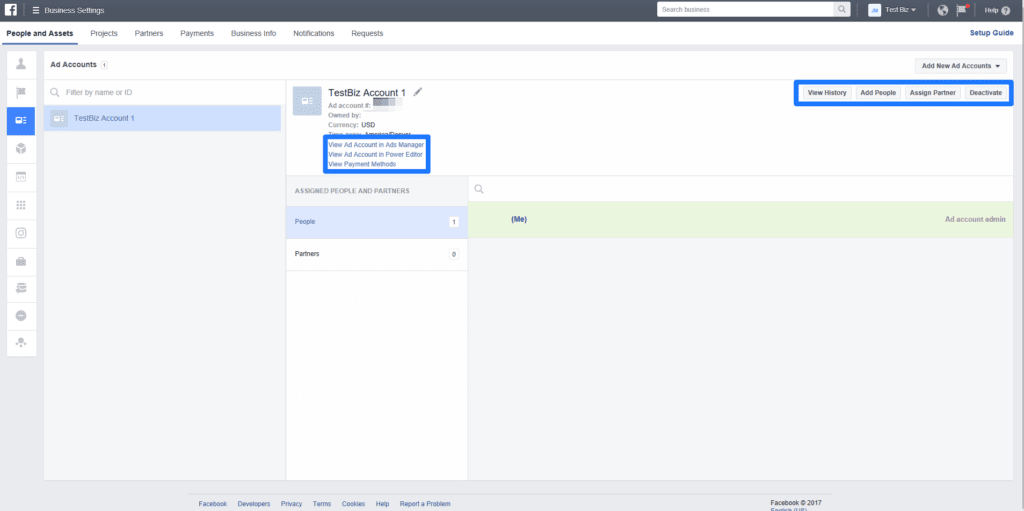

Now let’s add a new payment method. Look for the text link “View Payment Methods” as shown in the picture above. It will bring you to a blank page that confirms there are no payment methods currently available.
So click on the “Add Payment Method” button to begin:


Once you enter the appropriate details, your Facebook ad account will be almost ready to start advertising.
The only thing holding you back now is a Facebook Business Page (if you don’t have it already). So let’s set one up.
Step 3: Create a Facebook Business Page
Head back to the Setup Guide section of the Business Manager and look for “Create Page” to get started creating one from scratch.

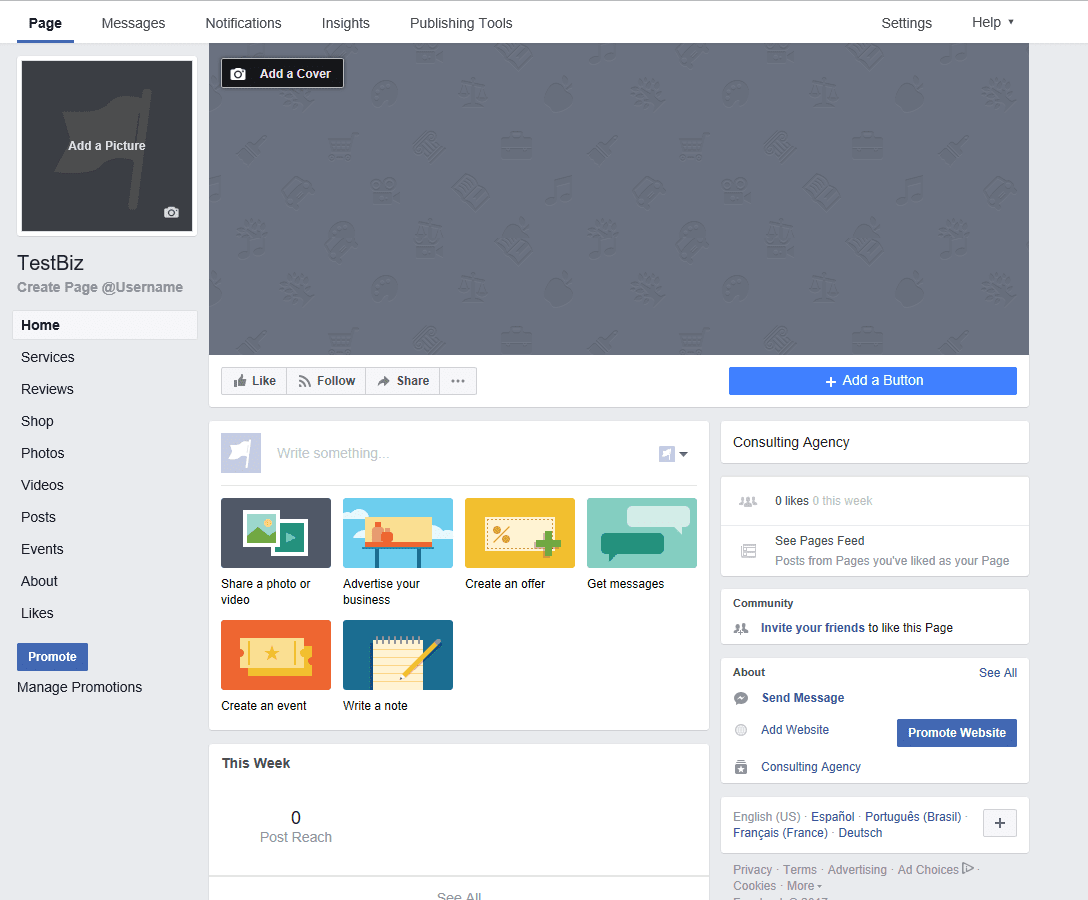
First, you’ll need to choose a Category for your page:
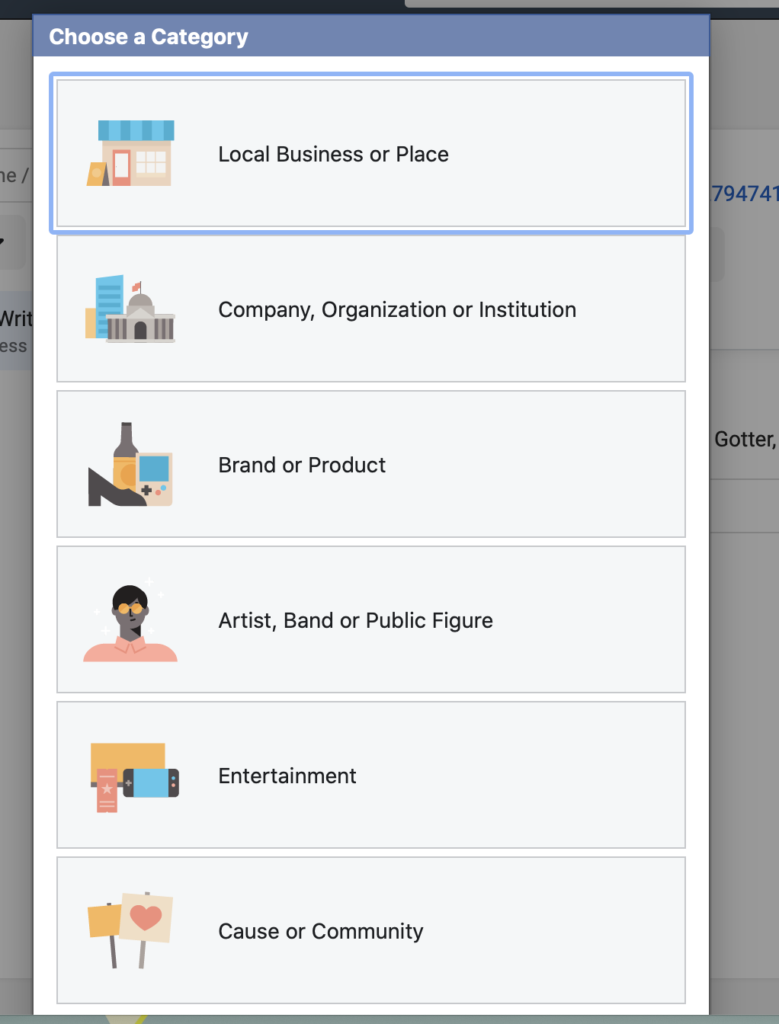

Go ahead and type in your Page Name (for the Company) and select a business category (e.g. Consulting Agency).
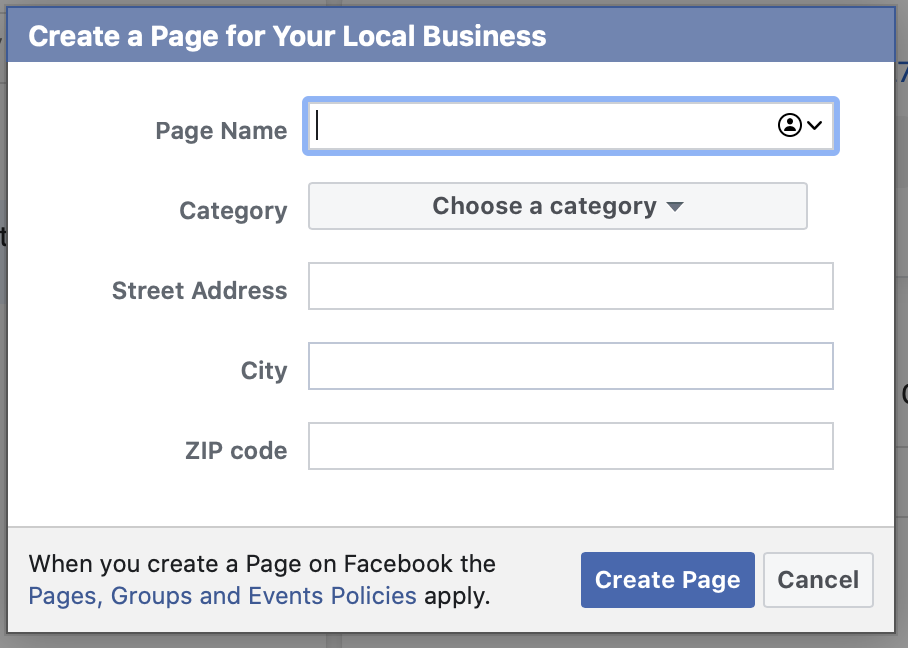

Click “Create Page” to you know, create your page, and Facebook will automatically link it back to your Business Manager, too. (Nice guys.)
Then, you’ll also be redirected back to your Business Dashboard to do one of two things next:
- Follow the link to your new page and started editing it, branding it, etc:
- Add people, a new partner, or remove the page at any time

If you click on the first choice, you can follow the link over to customize your new Facebook Page.

Let’s give a look to the second option.
Step 4: Add Business Manager Admins and Employees
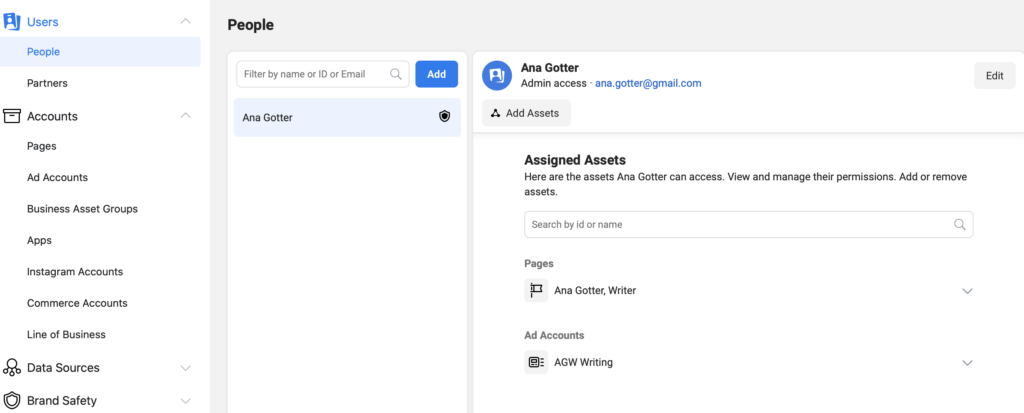
When you’re ready to add new team members to your Page or ad accounts, you’ll need to enter in their email addresses. You should see their profile picture pop up.
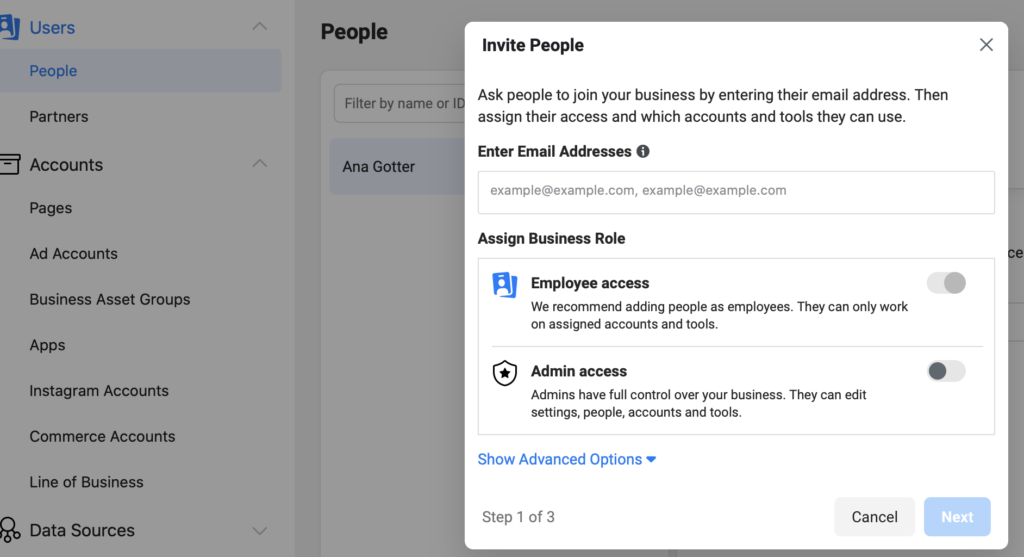
When you do this, you can grant them either “employee access” or “admin access.” Employee access is more restricted, only granting them specific access to certain features on assigned accounts and tools. An agency, for example, would give employees access to the accounts that they personally are managing, not all of the accounts that the agency manages. Admin access gives someone full control over your business, including the ability to add more people, adjust their access, and alter the account.

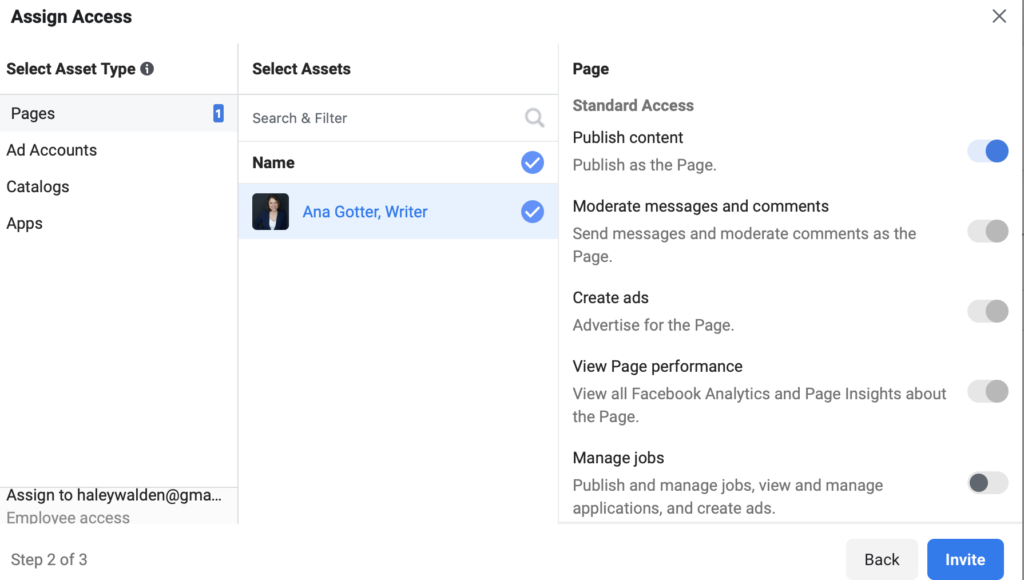

When you’re inviting specific users, you can choose which Pages you want to grant them access to, and which specific tasks you want them to be able to complete. You can limit this; even though “employee” roles allow someone to manage jobs, I can disable this feature for particular employees if I choose, which you can see here.
Step 5: Request Access or Claim a Page/Ad Account
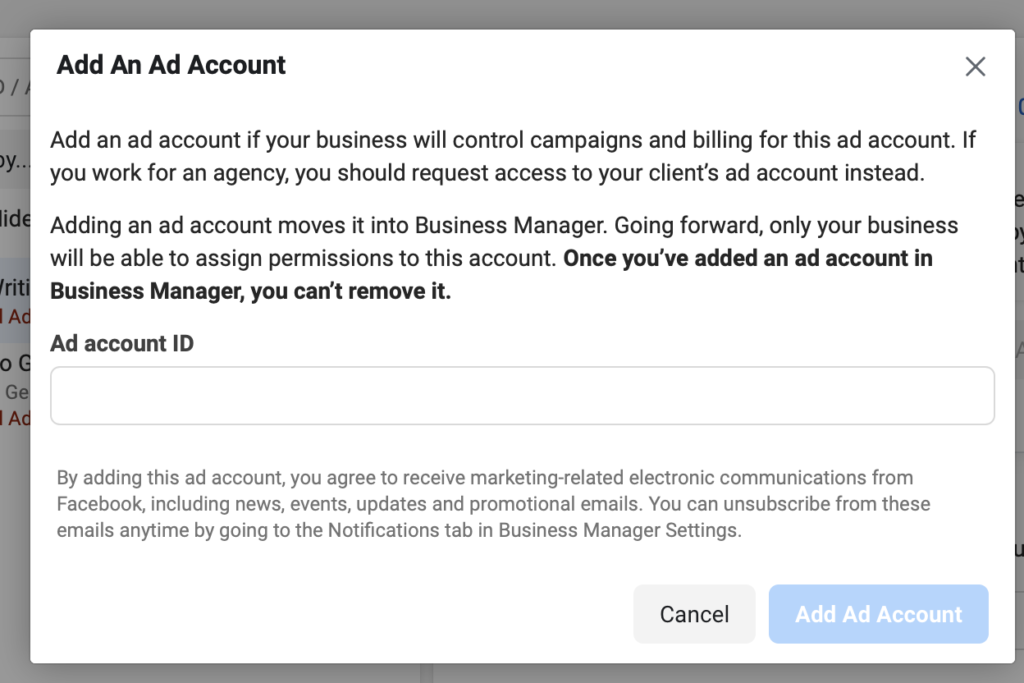
If there’s an existing ad account you want to sync up with, fortunately this is pretty easy to do, too. Head to your main Business Settings section, and then look for “Ad Accounts.”


Click “Add” and then choose the correct prompt. If you want to Add an account, you’ll need to enter in the account ID. Note that once you add an account to Business Manager, you can’t remove it.

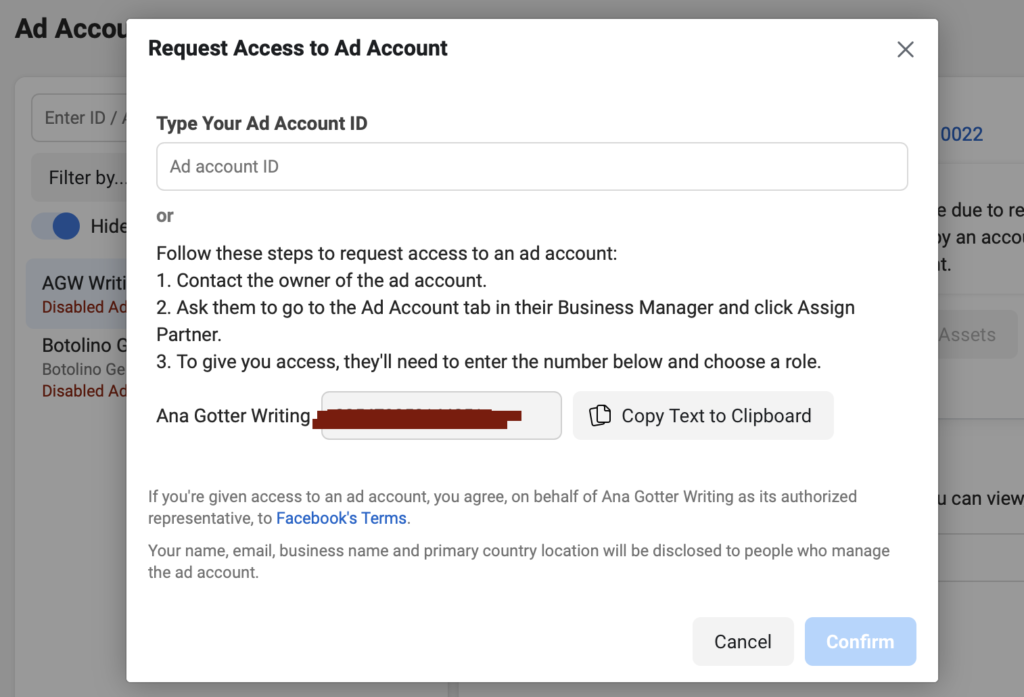
You can also request access to other ad accounts. If you’re synching up with a sister company, for example, or helping a client with their ad accounts, this is when you’d use this feature. You can either enter in the ad account’s ID (which the other party would need to supply to you) or have them Assign you as a partner utilizing a custom code that will be displayed here.

The Basics of the Facebook Business Manager
Let’s discuss how the Facebook Business Manager works now that you’ve got your ad accounts and the page linked.
Login to your Business Manager Dashboard look for the menu in the upper left-hand corner of the screen.

This will expand the entire menu of items you’ll typically work within the Facebook Business Manager.
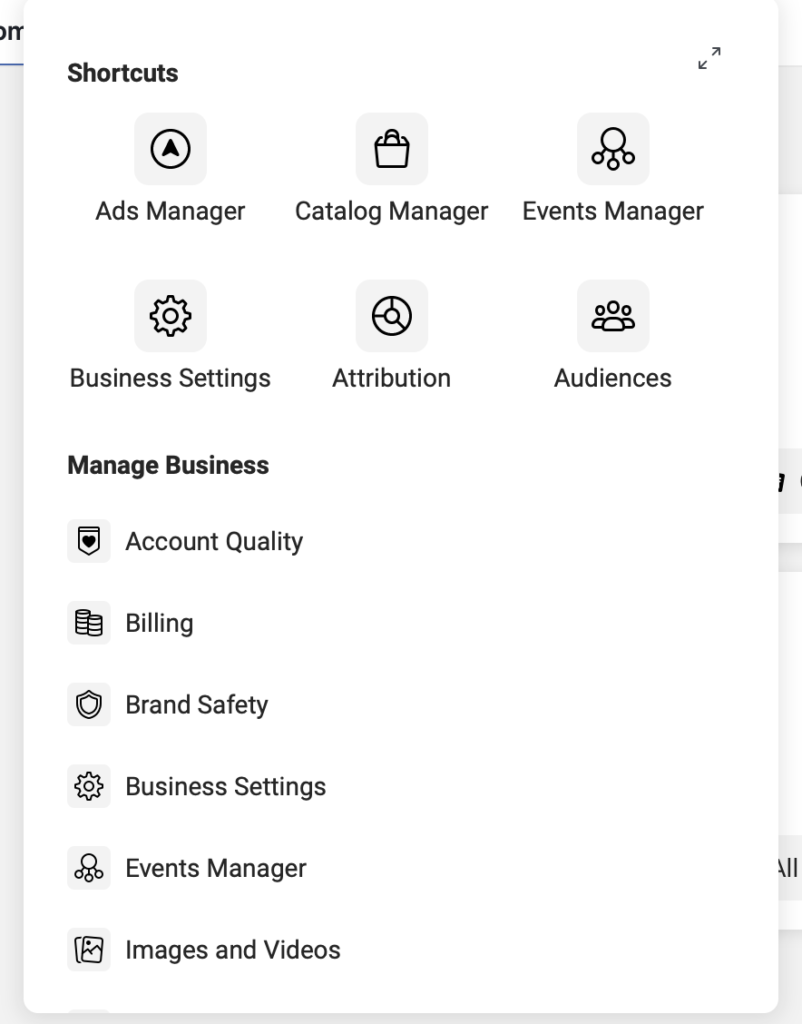

This menu is like your ‘jumping off’ point because you can do almost anything from here.
You can create or manage new ad campaigns. You can edit or add new apps. You can create new page posts. All of your data, analytics, and conversion information will be a click away. And you can even manage audiences, pixels, product catalogs, and videos.
Here’s how you can create new audiences for your ad campaigns.
How to Create New Facebook Ad Audiences
Open up the Business Manager menu and look for the Audiences tab.
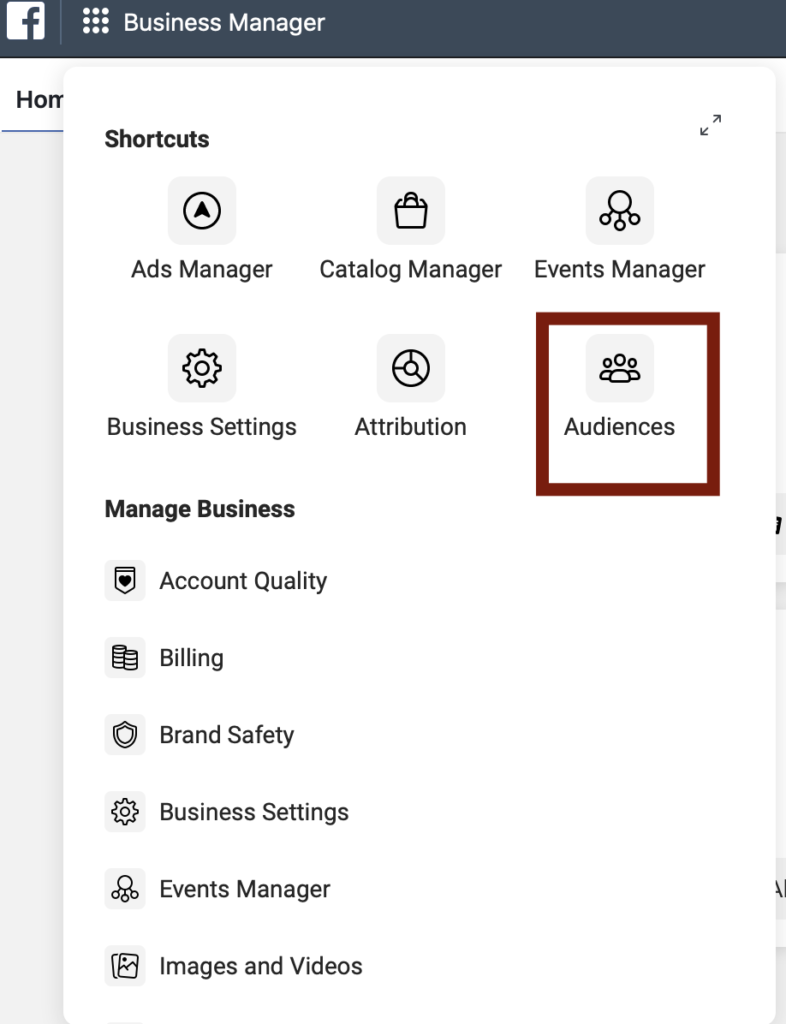

Here we can choose between creating three new audiences:
- Custom: You can connect with people who’ve already expressed some interest in you or your business by visiting your website, engaging with your Facebook page, and more.
- Lookalike: Reach ‘friends of fans’ who are the carbon copies of people you’ve specified; Perfect for increasing the number of new people to promote your brand.
- Saved: These are people you’ve found by creating a custom combination of demographic information with interest inclusion or exclusions.

Let’s take a look at how to create each one now.
Custom Audience Setup
Custom audiences are most often used to connect with the people who have already shown an interest in your business, service, or product.


You can create a custom audience from a contact list, previous or ongoing website traffic, or mobile app usage.
Here’s how to get started.
- Step #1: Go to Audiences and select “Create a Custom Audience”
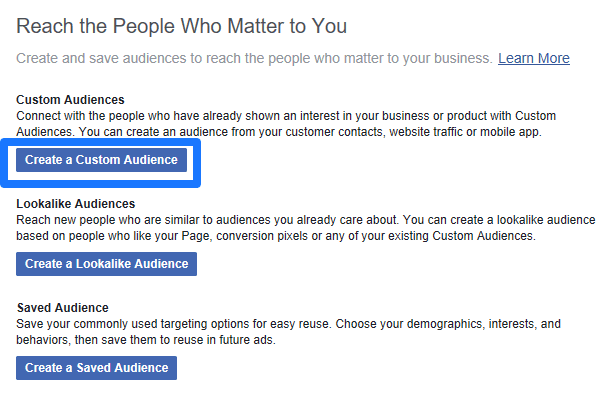

- Step #2. Select which type of custom audience to create out of Customer File, Website Traffic, App Activity, or Engagement.
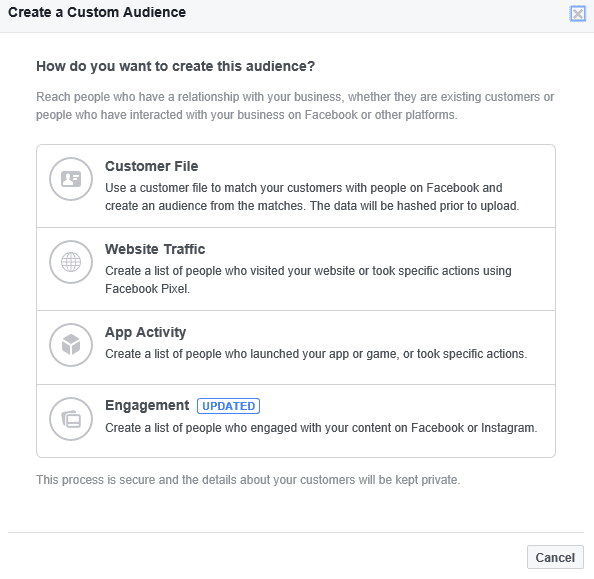

A Customer File custom audience consists of current/existing customers. You can target ads to these customers on Facebook and Instagram (and the audience network).
If you have MailChimp, you’re in luck! There’s already an existing integration so you can instantly connect your account. Otherwise, you’ll most likely need to upload a file of customer data (like emails or phone numbers) that Facebook will then use to match against their user database.
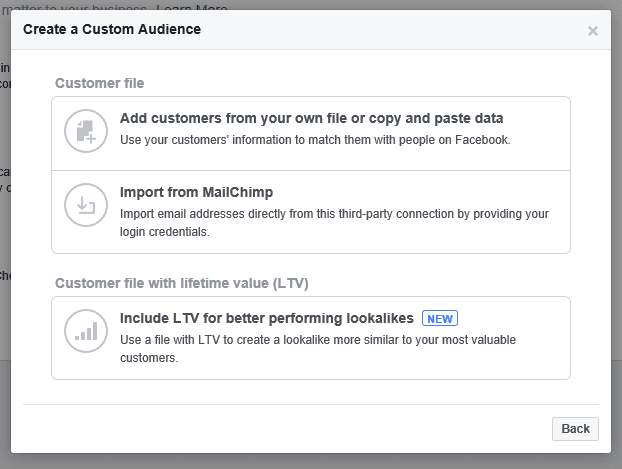

Here’s how it looks when you go to setup your upload a customer list:
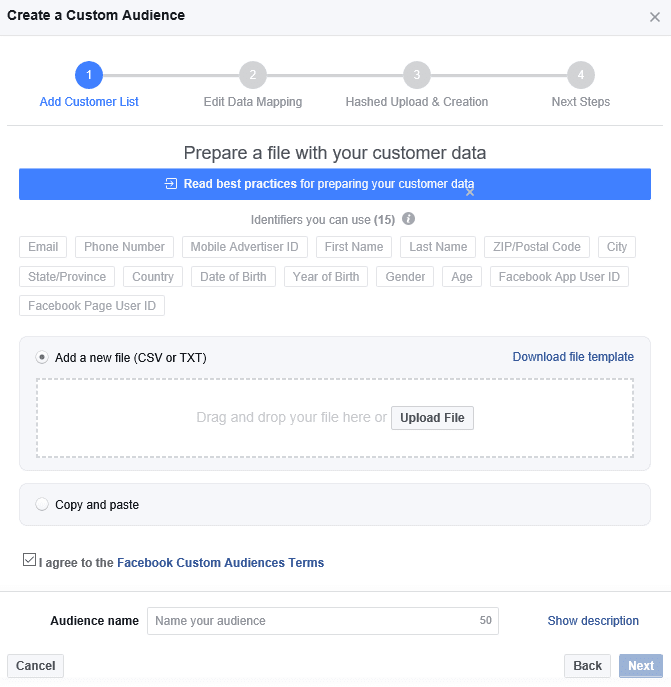

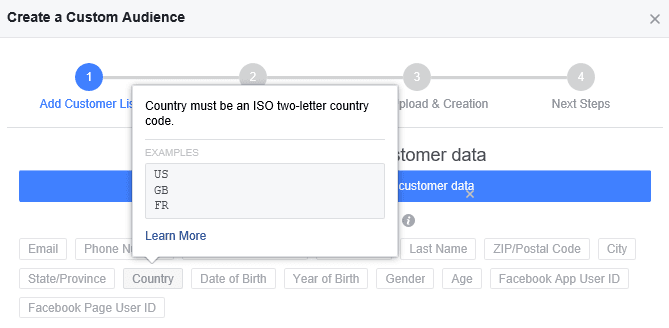
Here you can simply copy and paste your list or upload a .CSV/TXT file. Under the identifiers section, you can highlight over each one to see an example to inform your file structure:

Next, upload your list or paste it into the box and hit “Next” to map your identifiers.
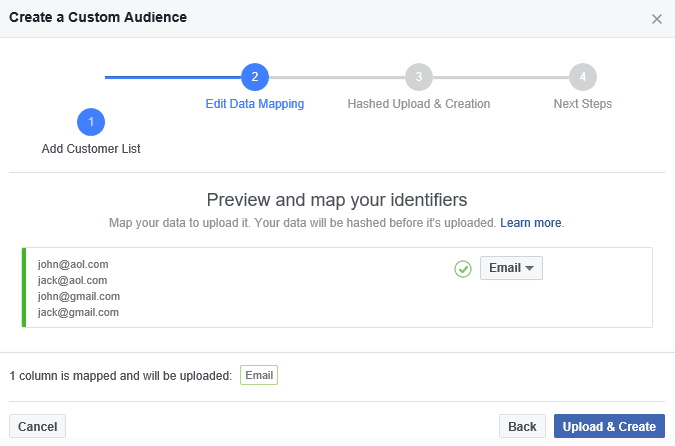

Hopefully, this should have automatically mapped fields for you. If everything is good to go, you should see a green check mark to signify the right format.
Next, click “Upload & Create” and you’re done.
If you click “Website Traffic” from the main custom audiences menu, you will simply have to install a pixel code on the website pages you want to track visitors. Some content management systems (CMS) will have an existing integration setup so that it only takes a few clicks. Otherwise, you’ll have to copy and paste some code to make it happen.

Next, you can adjust the individual audience settings based on your preferences.
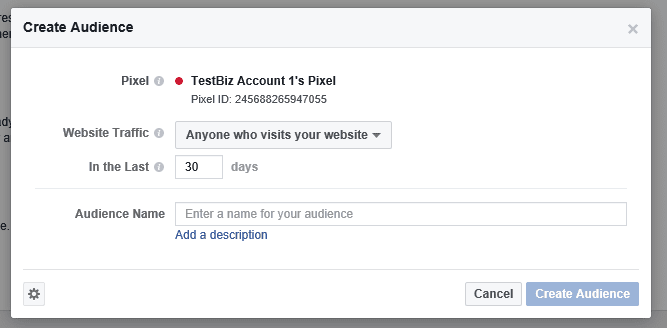

When finished, you’re all set!
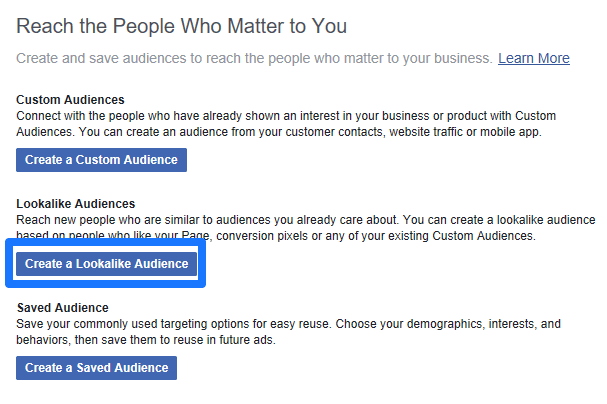
Lookalike Audience
Select “Create a Lookalike Audience” now to replicate one of your existing saved ones.
To create a lookalike audience, you need to have an existing audience that Facebook can then use to find ‘lookalike’ targets that similar to those already on your lists. So start by selecting the individual custom audience or Page as the Source for your new lookalike audience.
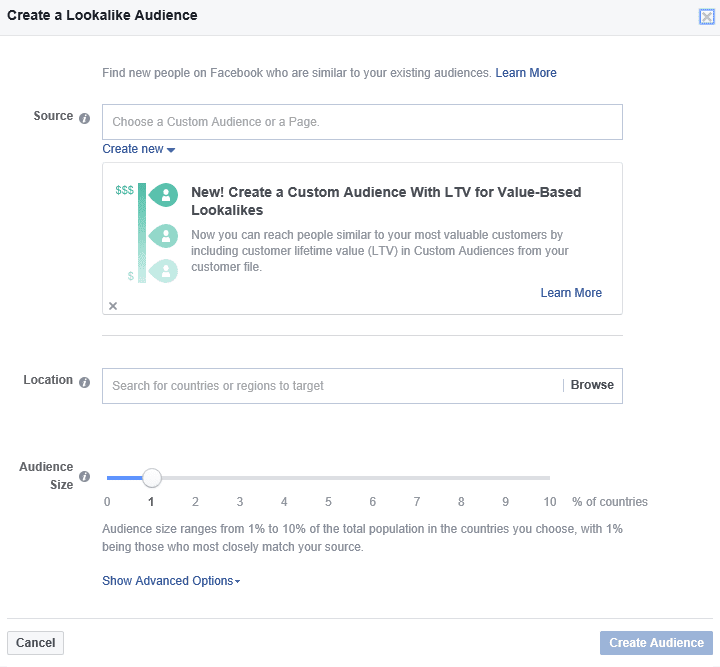

Then you can also select the locations to target and the audience sizes (which will determine how specific or small the targeting gets).
When satisfied, simply hit “Create Audience” and you’re all set.
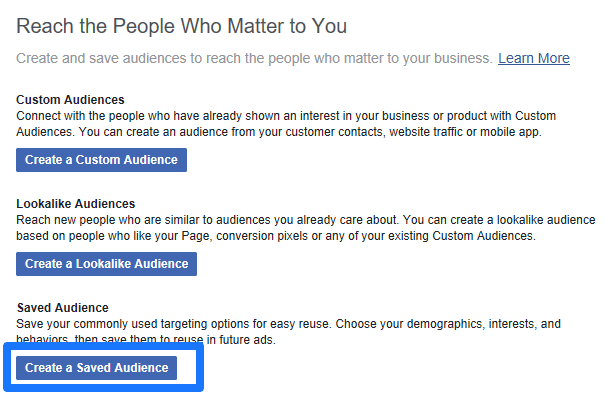
Saved Audience Setup
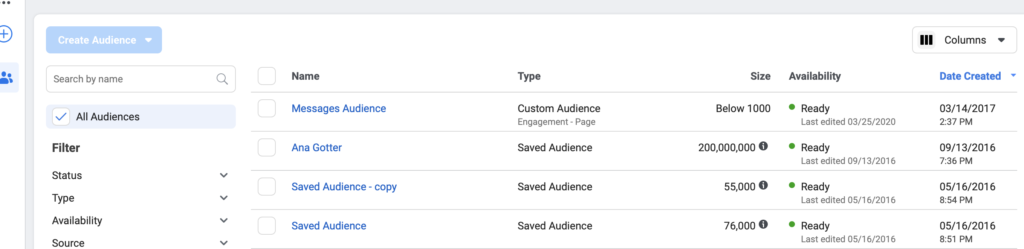
Navigate back to Asset Library and go to Audiences to create a saved audience.
The third and final choices could be “Create a Saved Audience.”
Here, you can create an audience from scratch choosing what locations, age range, demographics, and interests to target.
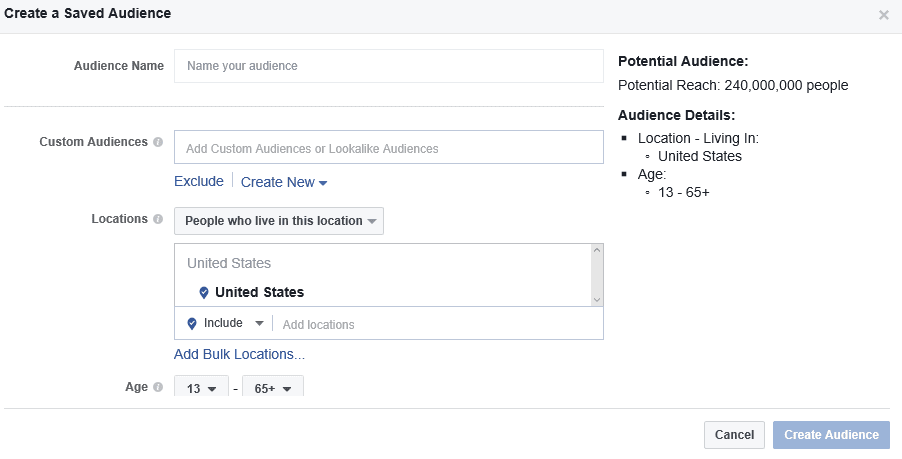

The Detailed Targeting will allow you to drill down into Demographics, Interests, Behaviors, and more to make your targeting even more granular.


These detailed targeting options will include values for job title, income ranges, interests, hobbies, and more.
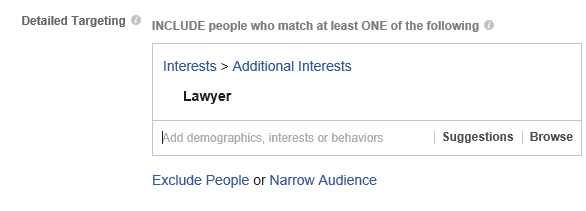
For example, you can start by selecting what someone does for a living:

Then you can narrow the audience further by excluding segments of people.
For example, you can add extra criteria on to the original job title to select only people who make over a certain amount of money each year:
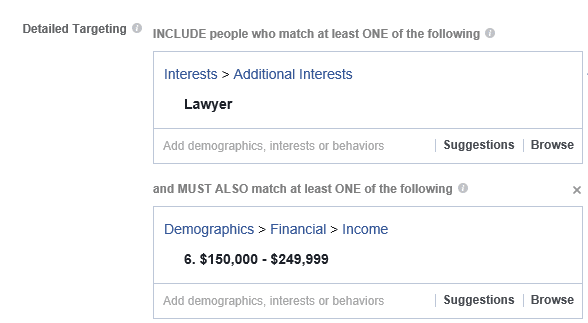

In this case, we only want to target attorneys with an income of at least $150-249k.
And then you can take it another step further by excluding an additional segment based on the type of lawyer you’d like to target:
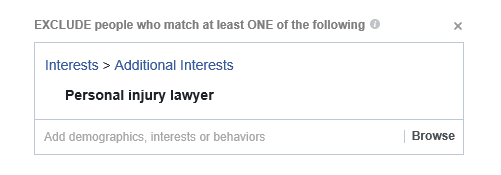

When ready, hit “Create Audience” and you’re all set to go.
Setting Up Pixels
Head back to the Business Manager dashboard and select Pixels under “Events Manager.” Here, you’ll be able to manage an existing pixel or set up a new one if needed.
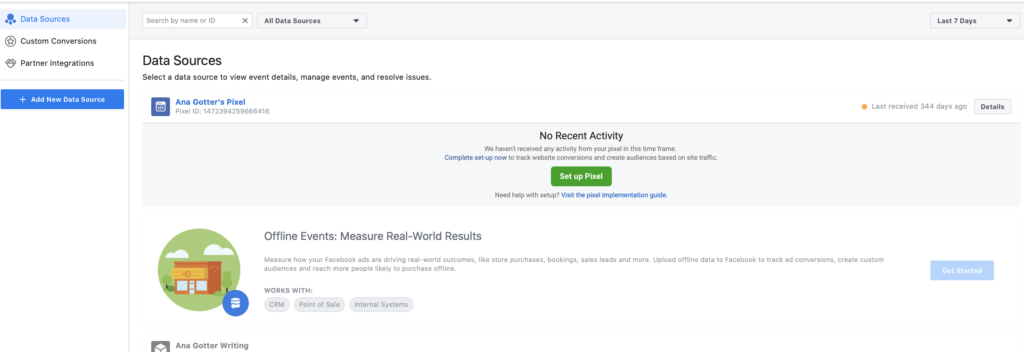

Click the green “Set Up Pixel” option if you’re ready to do so. (Remember, your tracking pixel is what helps you assess what actions are taken after an ad is clicked and allows for retargeting based on actions happening on your site and off-Facebook! It’s valuable!).
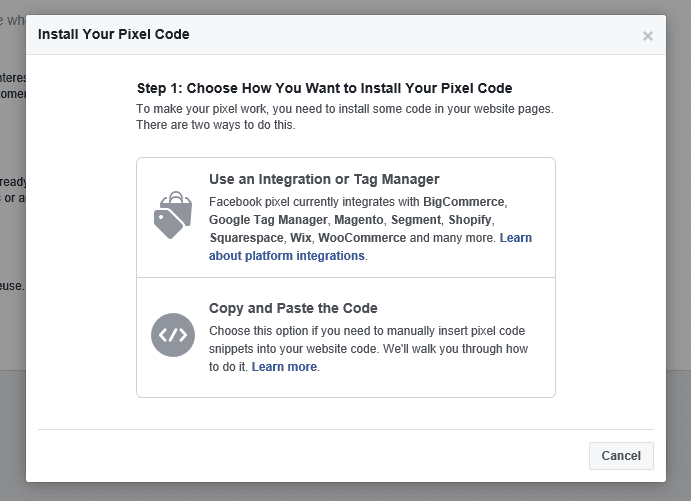
You can install the pixel code one of three ways:
- You can either integrate it with your existing CMS or use the Tag Manager.
- Or you can to install your code by just simply copying and pasting it into your site’s code.
- You can have the instructions sent to a site developer and have them do it for you.
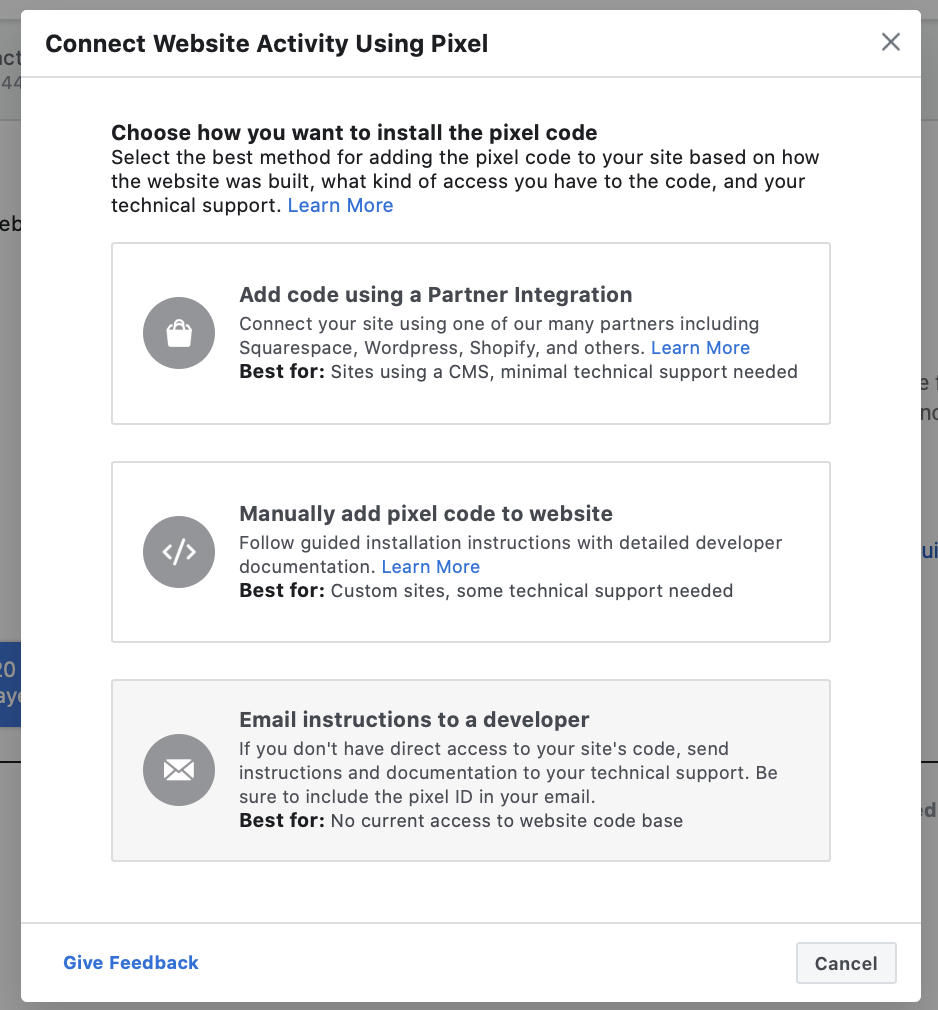

Click on one or the other to follow the instructions. (You can read more about how to set up the pixel fully here.)
Event Codes for the Tracking Pixel
Now, here’s where the fun begins: Event codes.
Event what?!
On a serious note: Events are actions taken by customers or users on your website. These are typically ‘soft’ goals, or micro-conversions, that don’t always result in a macro (revenue-generating) conversions. Think registering for a webinar, opting in to your email, or messaging your business.
The event code you install will let you track those actions for advertising purposes, things like when a product is added to cart, new pageview, etc. Here’s an example from Facebook to give you an idea of what your code will look like with events.
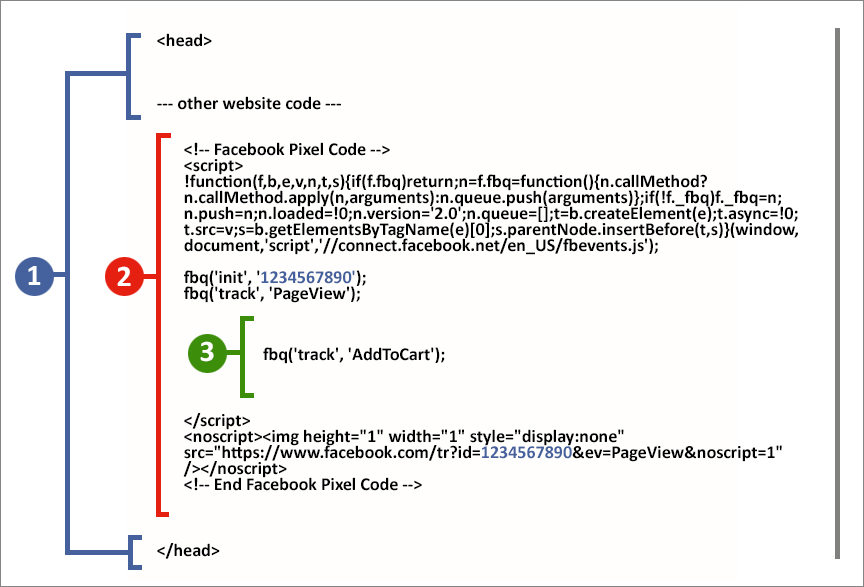

Where:
1 = Your website’s current code. You will paste the Pixel code between the two head tags of your web pages.
2 = Your FB pixel base code that you just copy and pasted
3 = Additional, standard event code.
Here are the nine standard event codes you can add to your Facebook Pixel code depending on which page you are customizing for:
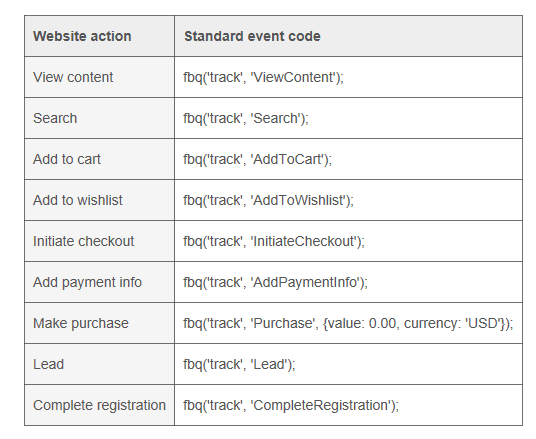

You’ll want to include these custom event codes onto the standard base code, and then attach them to each individual page that signals the action has been completed.
You would attach the tracking code and complete registration event code, for example, into the code on your “Thanks for Registering” page on your site. This page is only pulled up once that action was taken, and the pixel will fire and track that event. .
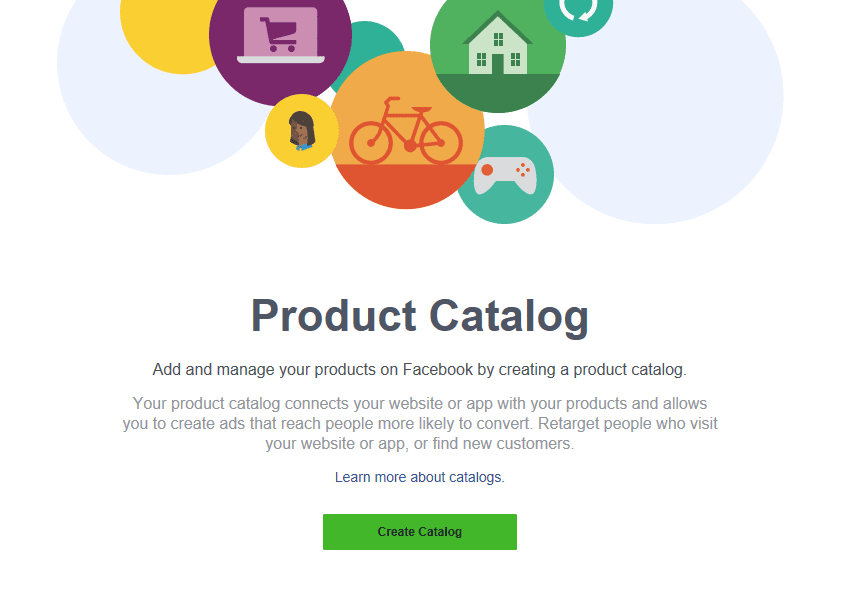
Creating Product Catalog in the Business Manager
Product catalogs are incredibly valuable. They allow you to create Dynamic Ads, which show specific products to specific users without you needing to create tens or hundreds or even thousands of individual ads for each individual product.
To create a product catalog, head to Assets in the Business Manager menu and click on “Product Catalogs.”
On the next screen, click on “Create Catalogs” to get started.

Here you will name your catalog and choose the appropriate type (e.g. Products, Hotels, Flights, Destinations, etc. :
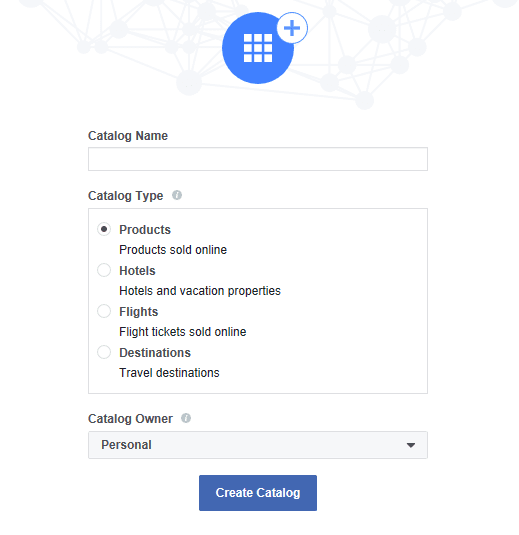

For this example, we chose “Products.” Next, you will be asked to add a product feed.
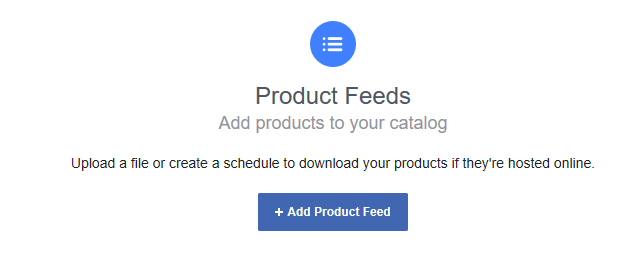

Go ahead and enter your feed name, currency, and upload type (single vs. recurring uploads):
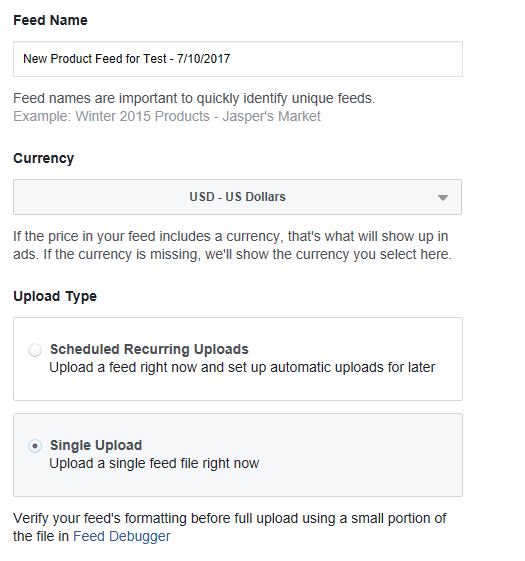

Then, hit next and get ready to upload your file.
Since you likely don’t have a product catalog setup or haven’t done one before, here are some basic guidelines below to help you format the spreadsheet properly. These fields are required for every product catalog.
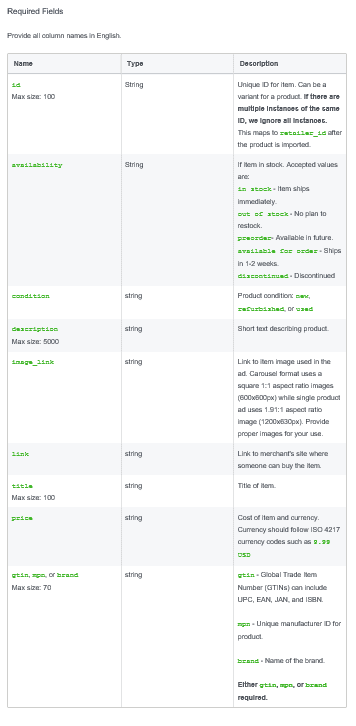

The good news is that many big eCommerce platforms, like Magento, BigCommerce, or Shopify for example, will have an app, extension, or feature to help support these product catalogs.
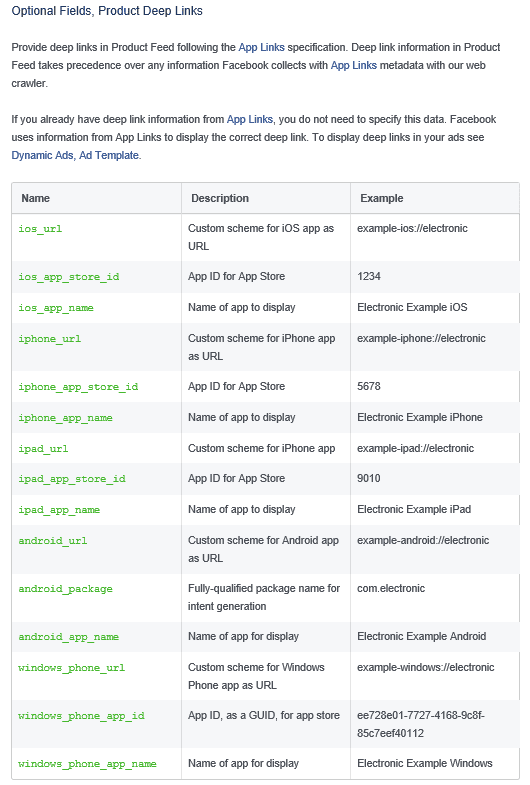
Next, you can add additional detailed items for each different product specs.

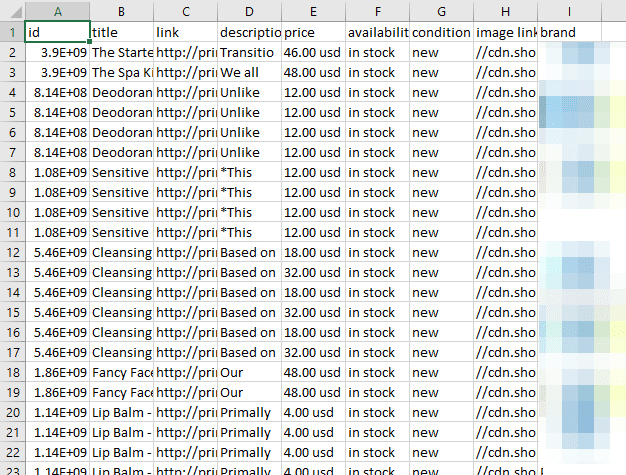
Once you’ve got a spreadsheet that looks something like this one below, go ahead and upload to get started.

Account Quality
One newish feature that we love about Facebook’s Business Manager is their “Account Quality” section.
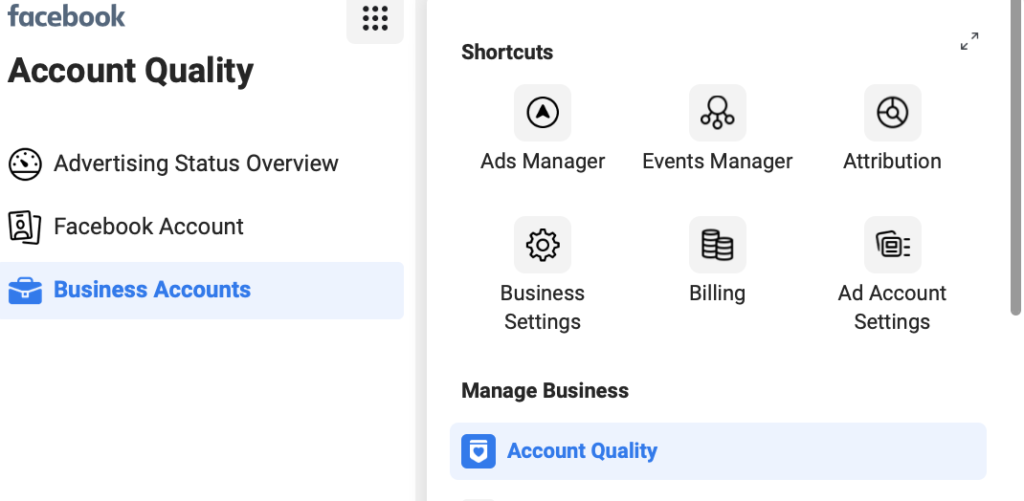

This section can be found under the “Manage Business” part of the Business Manager’s navigation, and it’s designed to help you quickly assess the health of your associated ad accounts and Pages quickly.
You’ll notice, for example, that there are two disabled ad accounts right now. One is an old client who essentially lets their accounts expire when they aren’t actively hiring me, and another is a demo account I created years ago for a blog post tutorial. In these cases, they’ve been disabled because they were out of use for a significant portion of time. Next to this, you can also see the total number of rejected ads from each account (in this case, there aren’t any).
![]()

You want to pay attention to this, because it essentially allows you to keep a close eye on the health of your actual campaigns. If you have too many rejected ads, it can actually cause Facebook to disable, pause, or even shut down your ad account. Keeping a close eye on this here is essential.
You can also monitor this section of the Business Manager for any advertising restrictions that have been placed on Pages that you own, manage, or monitor through the Business Manager. If you’re ever concerned about this, come here first; it can give you answers about how to proceed moving forward.
Adjusting Attribution
Attribution is used to assign credit to different marketing campaigns for a single sale. If someone sees your ad, for example, clicks, and immediately purchases, that ad will be credit (and receive attribution) for that sale.
Attribution is often trickier than this, however. If someone clicks on your ad but purchases 30 days later, does the ad still get credit? What if there were multiple other touchpoints? Your ad was first, or last, but multiple other touchpoints pushed users through the funnel. Who gets credit then?
Facebook’s standard and default attribution is “click and view.” If someone clicks on your ad and purchases within 28 days, the ad gets attribution for the sale, even if they clicked on other touchpoints afterward. And if they view your ad and convert within one day, the ad is attributed the sale.


This may work for some businesses, especially low-cost, low-risk purchases. Someone is likely to buy a pair of shoes within a month, for example. They may take much longer (and need to do a lot more research) to purchase a car, a tutoring subscription for their child, or even food for their dogs. So maybe they need 60 days to convert. If this is the case, you’ll want to head to “Business Settings” and then click to adjust your attribution. Keep in mind that you can only extend both windows to up to 28 days.
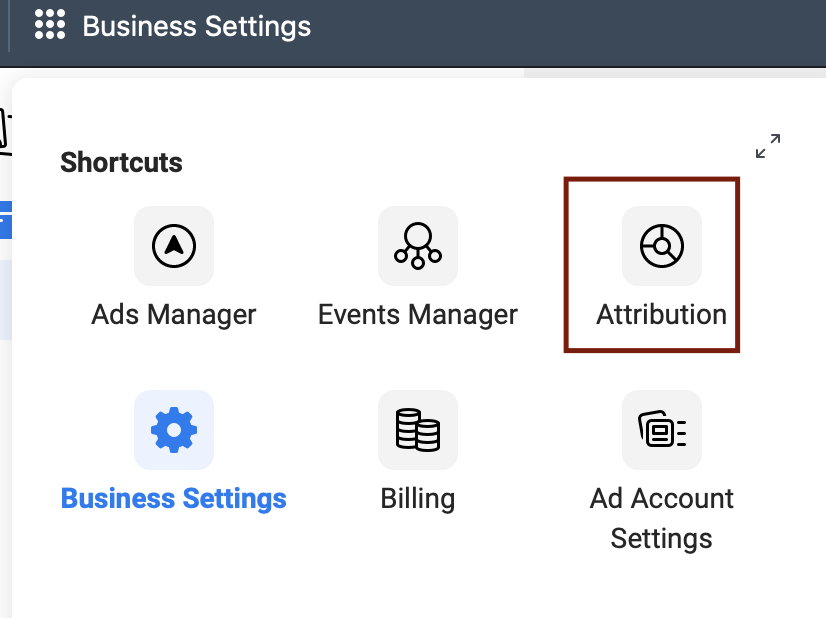
You can, however, adjust your attribution models, too. You can decide to give the most attribution to the first touchpoint and the last, for example, or to all touchpoints equally. This helps you assess your overall funnel. To customize the attribution model, you’re going to go to “Attribution” through the Busines Settings shortcuts.

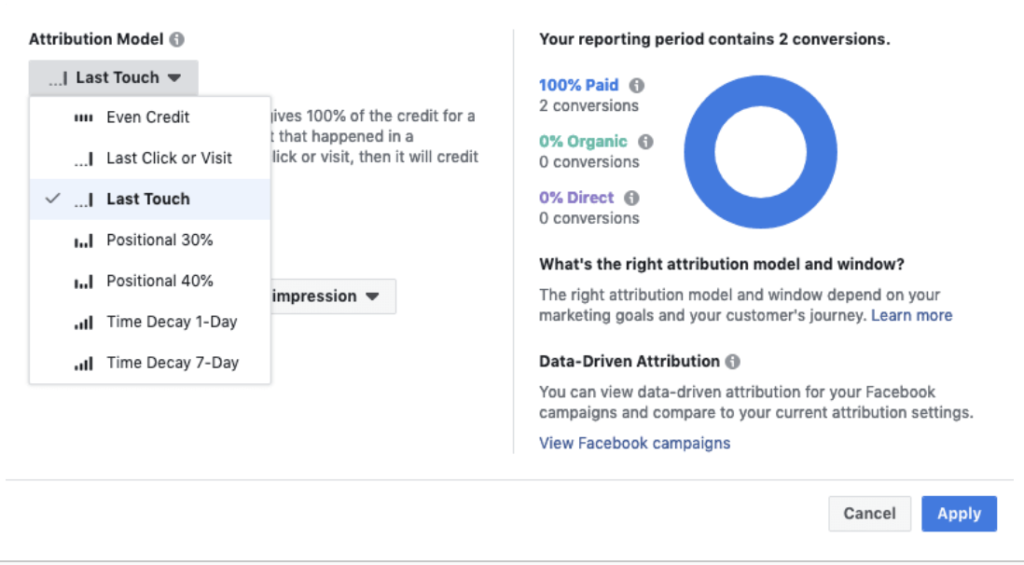
Once here, you can choose to alter the attribution model. Facebook essentially goes off the first click/view; it doesn’t matter where in the funnel the ad is. If they click or view and then convert within those time frames, the ad gets credit. We typically recommend using a positional or even credit mode; these take all touchpoints into account. Even credit distributes attribution evenly. Positional assigns the most value to the last click before conversions, and the second highest-value to the first click, with all other touchpoints in the middle receiving equal attribution.

If the current attribution model is working for you, great! But if you want to have a more accurate look at how your ads are actually impacting your overall campaigns and success, considering adjusting your attribution model may be right for you. Keep in mind that Facebook and Google Analytics use different attribution models, so you’ll likely see discrepancies if they’re not on the same page.
Conclusion
The Facebook Business Manager can seem daunting when you first log in. That’s normal; there’s a lot of content here, and it does take some time (and a bit of a learning curve) to get used to.
That being said, mastering the Business Manager is definitely more than worth it, even if you’re a single business owner running a single Page.
This tool will allow you to run much more sophisticated ad campaigns and keep a much closer eye on your ad account and Page in general.
Improved campaigns and better monitoring is always a good thing, allowing you to achieve more results faster.
What do you think? Do you use Facebook’s Business Manager? Which features do you find most valuable? If you don’t use it, what’s keeping you from diving in? Share your thoughts and questions in the comments below!