


In a world overrun by advertising, consumers are becoming immune. Or actively taking steps to replace ads altogether. That’s why the average banner ad click-through rate is 0.1%.
You don’t beat these grim numbers with more ads. You do it through better ones.
Specifically, with ads that are more targeted and more relevant.

And Facebook’s Dynamic Product Ads are one of the best ways to do that.
For example, luxury sunglasses brand 9Five saw a 3.8X return on ad spend and a cost per acquisition 40% cheaper than their goal by implementing dynamic product ads (DPA’s).
In this actionable guide, we’re going to take you step by step through the process of setting up your first Dynamic Product Ad campaign.
As an advertiser, imagine if you could design the perfect ad type. These are the main features that would be on our wishlist:
- Personalized ads, relevant to each prospect and customer
- Easy to set up, with low ongoing maintenance
- Works across a wide range of Facebook, Instagram and Audience Network placements
- Highly effective, generating a good ROI
Welcome to Dynamic Product Ads!
What are Dynamic Product Ads?
Facebook does a great job of summarizing what DPA’s are:
Dynamic ads look similar to other ads on Facebook, Instagram, Messenger and the Audience Network. However, instead of individually creating an ad for each of your products, you create an ad template that automatically uses images and details from your data feed for things you’d like to advertise. Dynamic ads use your Facebook pixel or SDK to show ads to people who have already shown interest in your business by taking actions you care about on your site.”
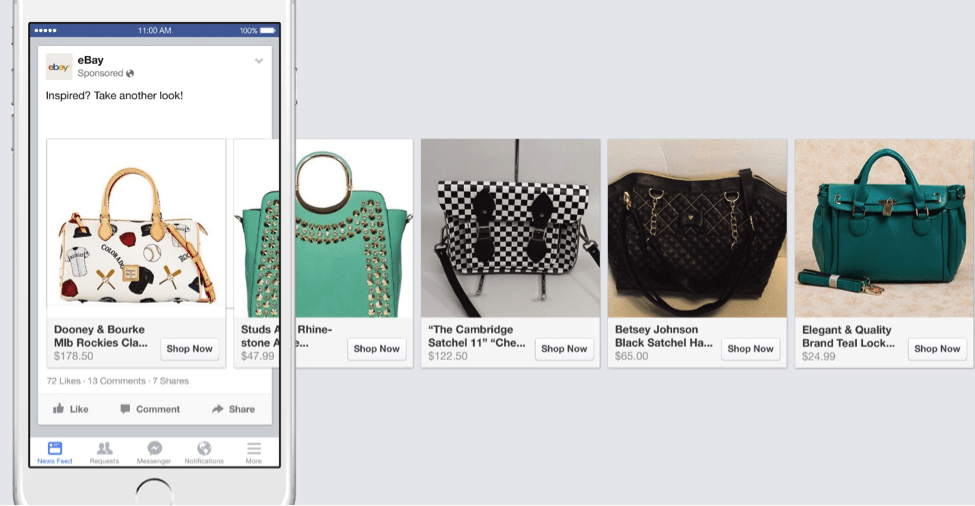
You’ve probably seen plenty of these ads in your Facebook feed, but to recap here’s an example from eBay. At any one time there are millions of products listed on their site, but they can advertise the exact same products that people have recently viewed:

When NOT To Use Dynamic Product Ads (and What TO DO Instead)
As standard carousel ads can display up to 10 images, if you are starting out and have under 10 products, you may prefer to keep it simple and use carousels.
For 10-20 products, if they are all very similar you could get away with a normal carousel ad showing just the best selling options.
As a rule of thumb, if you have over 10 items and they are diverse, or over 20 products even if they are similar, it’s time to consider adding DPA’s into your marketing strategy.
If you’re looking for other ways of retargeting that don’t involve Dynamic Product Ads, join us on Thursday for our free webinar covering Facebook and Google retargeting strategies.


Click Here (or on the image) to reserve your FREE spot
In this free webinar, our Facebook Ads Specialist Paul Fairbrother will run through the warm audiences that you must be using to be successful in 2019. We’ll also cover the best converting retargeting strategies including Evergreen campaigns which allow you to run your retargeting on autopilot.
We’ll then turn our attention to Google, where our Google Ads Specialist Bruno Morris will cover how to set up your Google Ads retargeting for maximum ROI.
Join AdEspresso for this exclusive one-hour live training! Can’t make it or want to watch it again? No problem! We’ll be sending you the recording shortly after the end of the webinar.
Dynamic Product Ads 101
To successfully set up Dynamic Product Ads for best results, here are the five key steps you need to take.
1. Install the Facebook pixel on your website or use the Facebook SDK for mobile apps
To get started with pixels, check out our handy guide here. Most major shopping carts can then automatically populate the pixel events. The main pixel events required for DPA are:
- View Content: this fires when someone views a particular product page
- Add To Cart: this is the next step down the funnel after viewing a product, when it’s added to the cart
- Purchase: the final step in the checkout process
The pixel events allow us to create a highly relevant audience, for example, people that have viewed a product but not purchased it.
2. Create Your Product Catalog
We’ll cover this in more detail below, but essentially you need to link the catalog on your eCommerce store to Facebook so that it can be plugged into the ads.
3. Segment the Products into Product Sets
For general retargeting of people that have viewed a product, it’s useful to have a product set that contains all products. However, you also want to create sets of carefully curated products for broad targeting, up-sells and cross-sells as we’ll cover below.
Imagine Apple decided to run DPA ads to cold traffic. It would make sense to create a product set containing the latest iPhones, iPads, and MacBooks and exclude the rest to showcase just the best products, otherwise, the ads might be filled with dongles, more dongles, and yet more dongles.
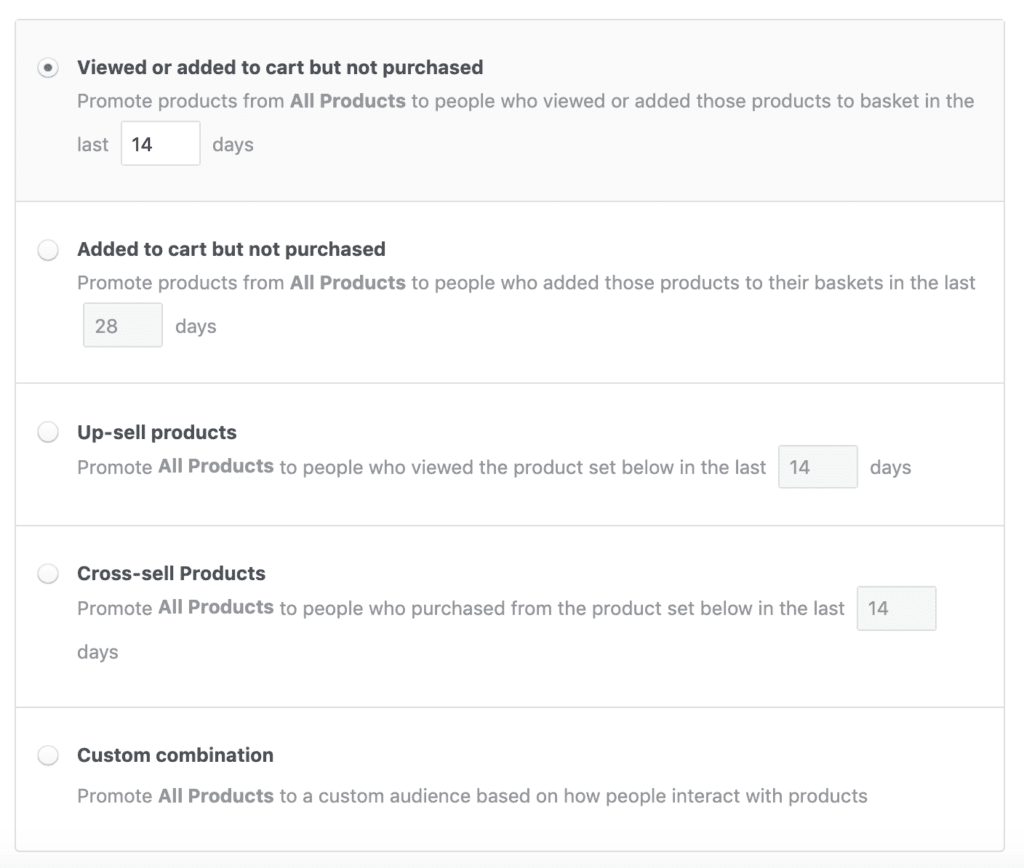
4. Decide Which Audience to Use
There are four main options to consider when selecting the audience:
-
Broad audience:
These are Facebook users that haven’t viewed your products yet. Facebook optimizes which products to display over time based on results.
-
View content or add to cart but not purchased:
As covered above in the pixel section, you can show relevant ads to prospects that have interacted with your shopping site but not yet purchased.
-
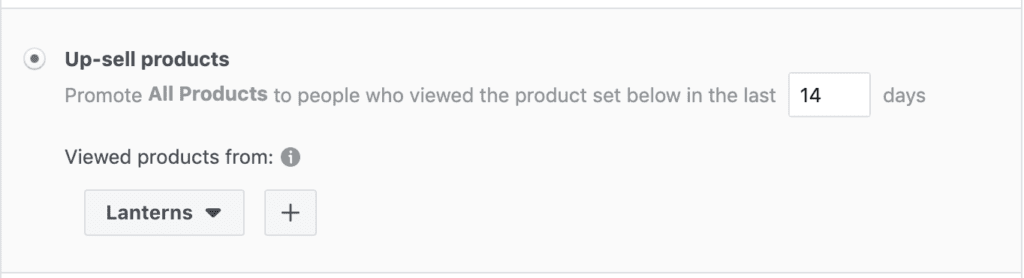
Up-sell:
Show a product set to users that have viewed a different product set. For instance, if someone views individual items for sale, retarget them with discounted bundles.
-
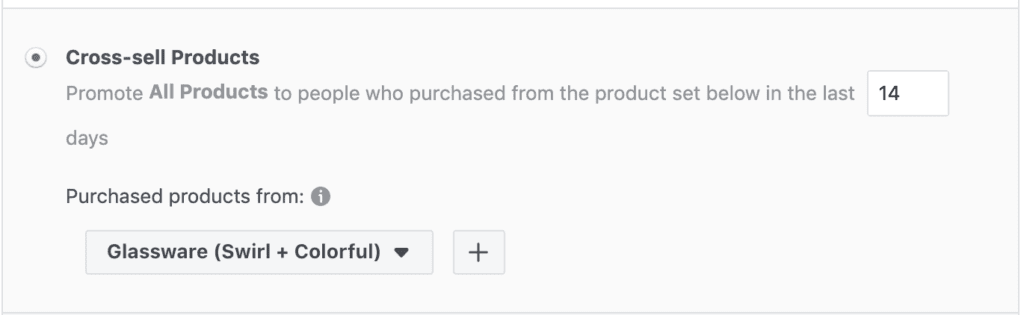
Cross-sell:
Maximize your customer lifetime value by showing relevant products to purchasers. As an example, if a customer buys a cellphone show them ads for a case, charger and screen protector that fits that model.
Don’t worry if you’re not sure which option is best to use at this stage, we’ll cover these in more detail when we turn our attention to campaign setup later on.
5. Create Your Ad
This is the easy part, as most of the information is populated from the product catalog. You can use “dynamic placeholders” in the ad text, this is where the brand or product name, item description or the price can be pulled in from the product catalog and shown in the ad.
Creating Your Facebook Product Catalog
Your eCommerce site will have a database containing all the products and the important information such as brand, product name, price, and image. Now we need to export that to Facebook so that we can convert the catalog into ads.
Originally, this was a manual process that involved exporting a CSV or XML file containing the main product attributes.


We still use this sometimes for small catalogs, but where possible it’s good to use a plugin to automatically sync the eCommerce catalog to Facebook. Without this, a new upload is required every time a new item is added to the website.
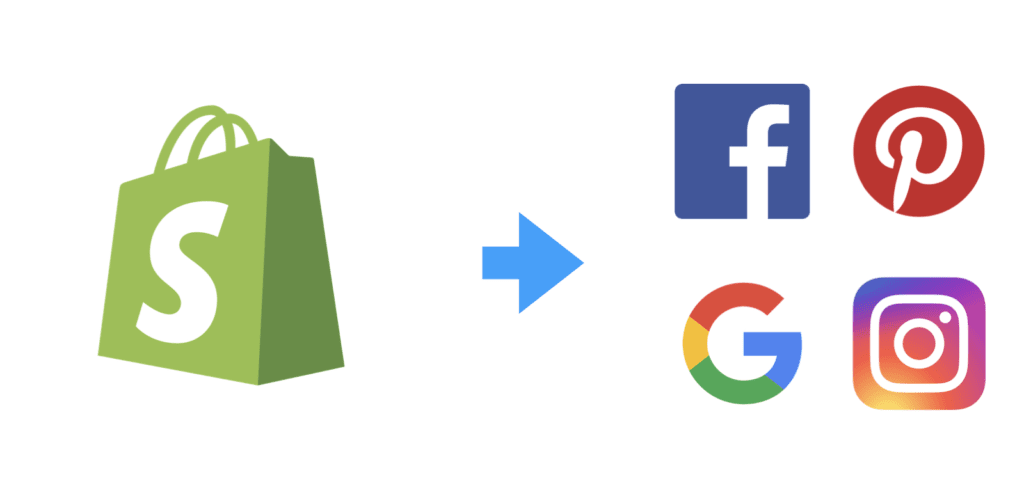
Every eCommerce platform has catalog integration options, and below we’ll cover examples for Shopify and WooCommerce.
Shopify – Fleixify
Over 40,000 Shopify merchants use the Flexify app, with a free plan available if you’re syncing up to 1,000 products.

While we don’t endorse any particular Shopify app, Flexify has a 4-star rating in the Shopify app store, and with the free plan, it’s worth considering.
Product Catalog Settings And Diagnostics
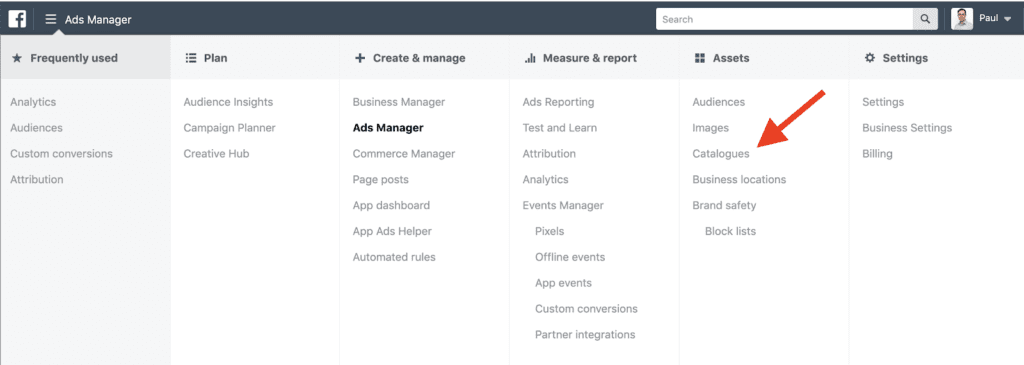
Once the catalog is set up, it’s important to check it every so often to ensure the sync is working correctly and that there aren’t any errors with audience matching. In Business Manager, go to Assets > Catalogs to view any catalogs that you have created or that have been assigned to you.

You’ll then see a left-hand menu:
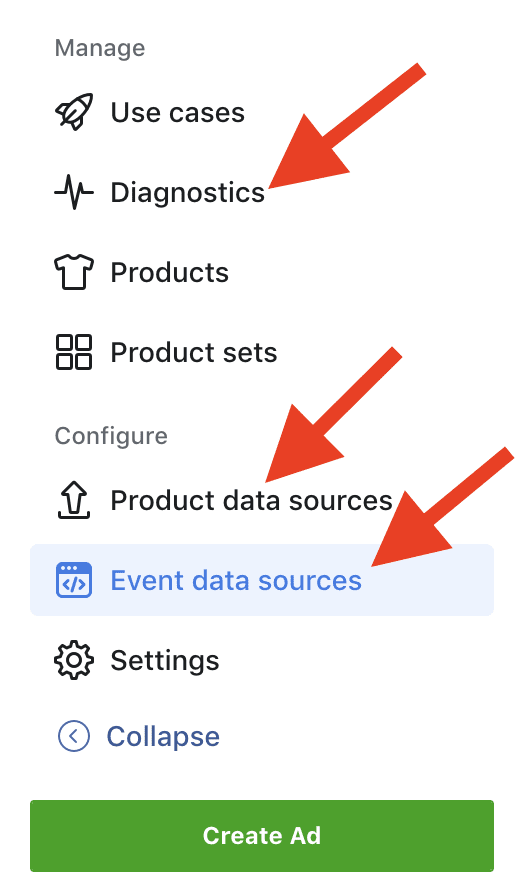

Focus on these three options:
-
Diagnostics:
as the name suggests, this is the area where Facebook gives an overview of any changes that need to be made.
-
Product data sources:
use this page to check if your product feeds are regularly being updated
-
Event data sources:
if you are running retargeting ads, keeping an eye on this page is essential to check if all of the products being viewed can be retargeted with ads. The “see all website conversions” link at the bottom of the page gives more detail to help with debugging.
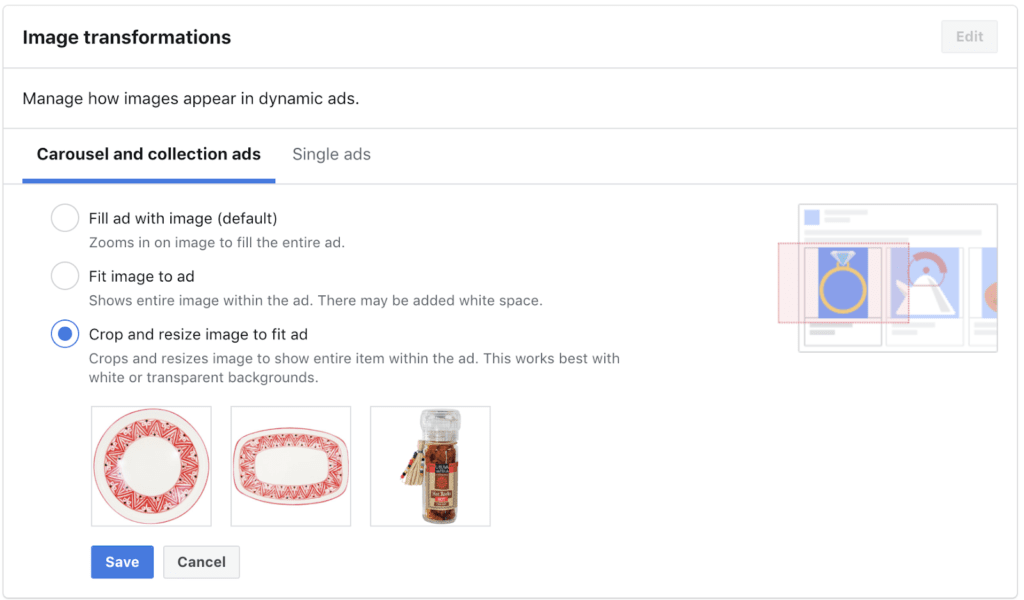
Tip: customize the way images are displayed
Under Settings > Image Transformations there are three options for how the images are displayed in carousel ads.
The default is “fill ad with image” but often switching to “crop and resize image to fit ad” will result in the images filling more of the space.

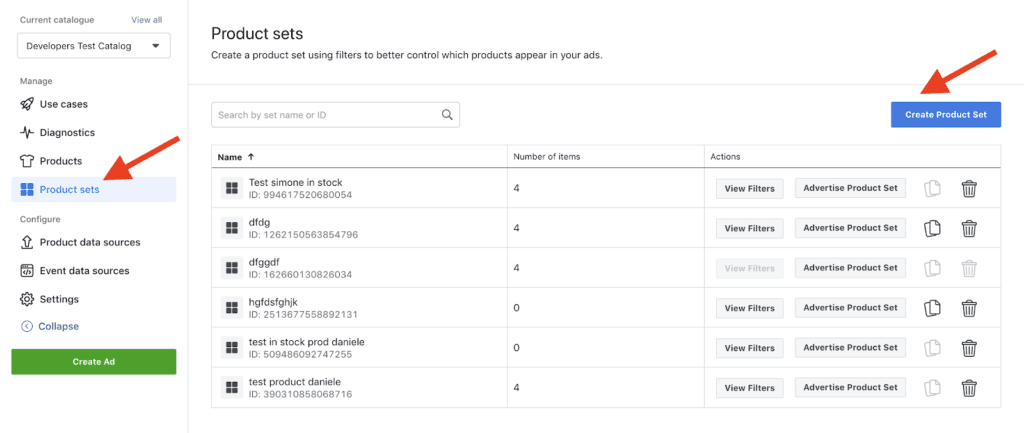
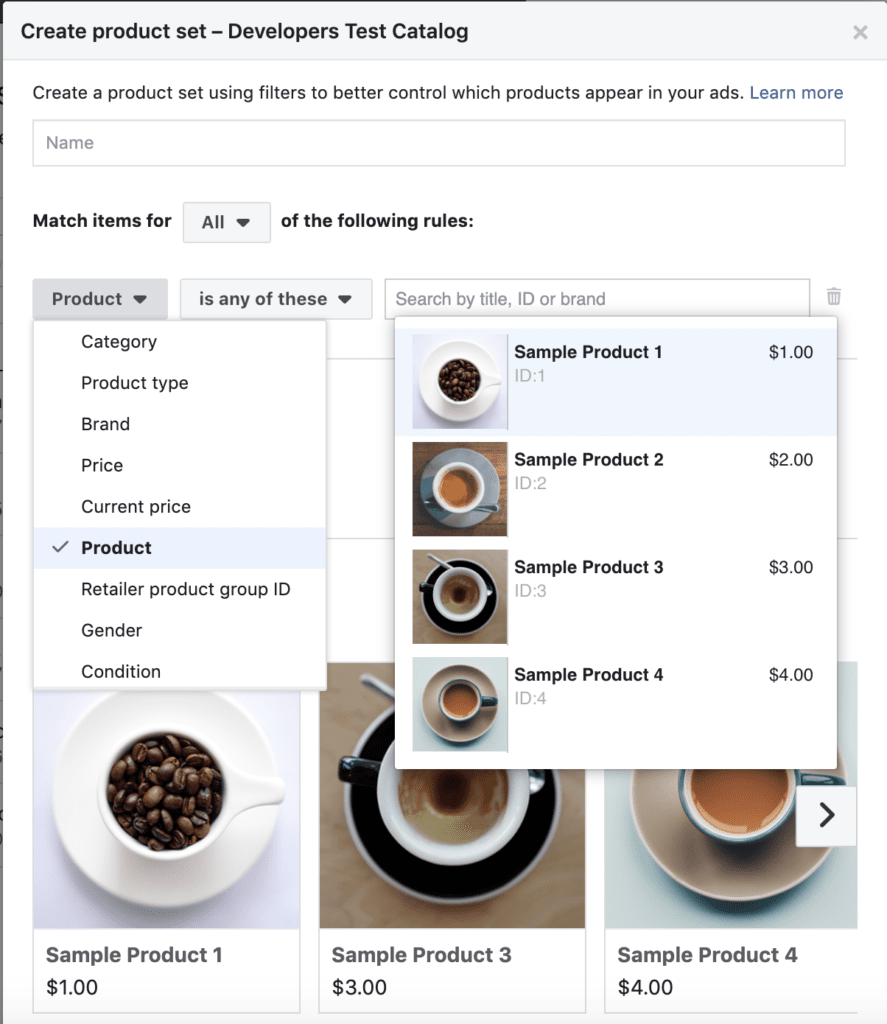
Product Sets
If you have a diverse product range, you’ll want to segment it into different sets so that you can display a curated group of products to people when running broad audience, cross-sell and up-sell campaigns.
Just select product sets from the left hand menu then use the button to create a new set.


Creating A Dynamic Product Ad Campaign
If you’re already used to creating Facebook ads, then setting up your first DPA campaign is going to be straightforward.
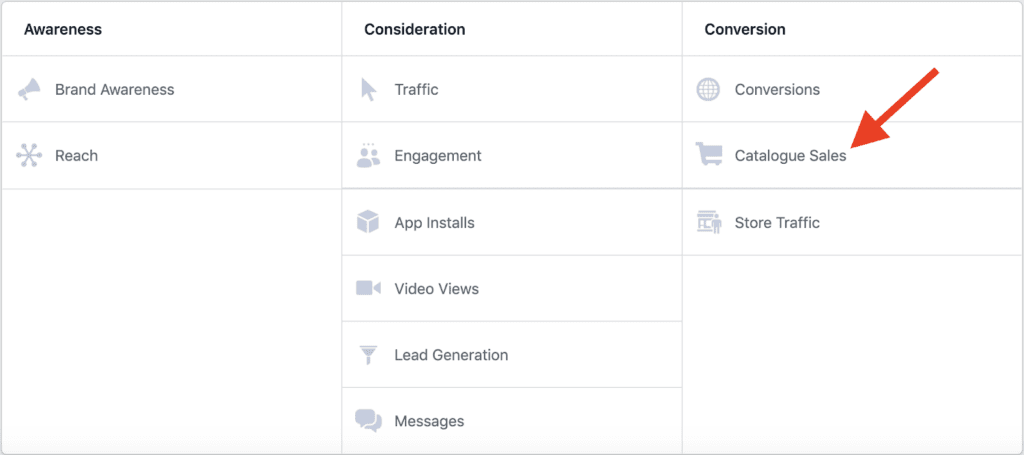
Select “catalog sales” under the conversion options:

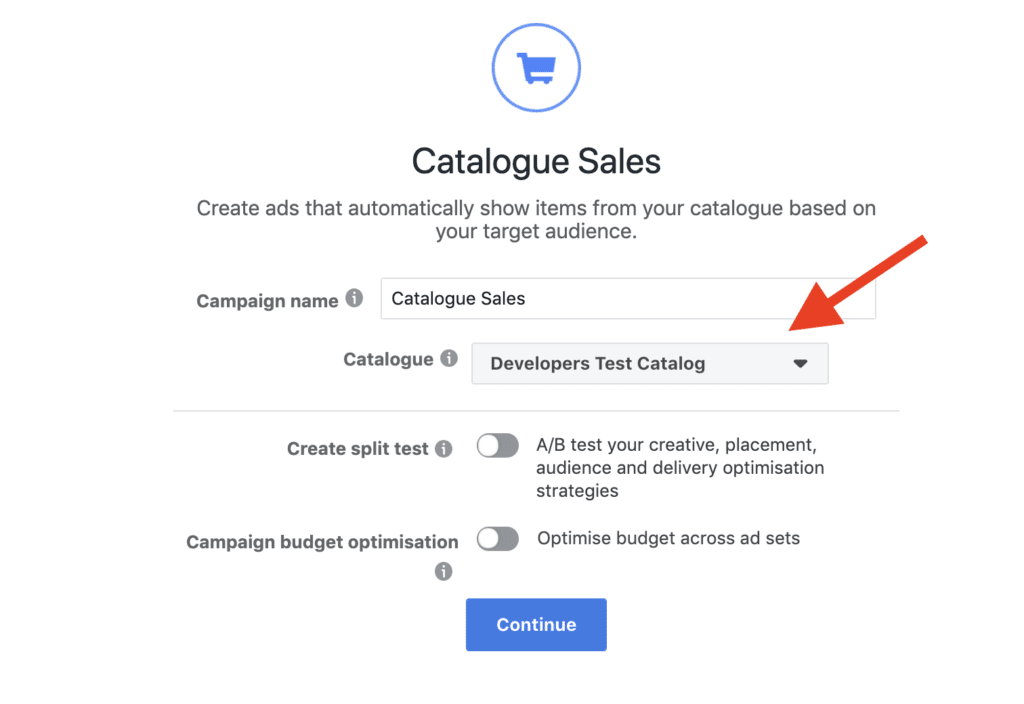
The first step is to choose your product catalog.
If you’re a business owner, you probably just have one, however, an agency might have dozens assigned to them from various clients.

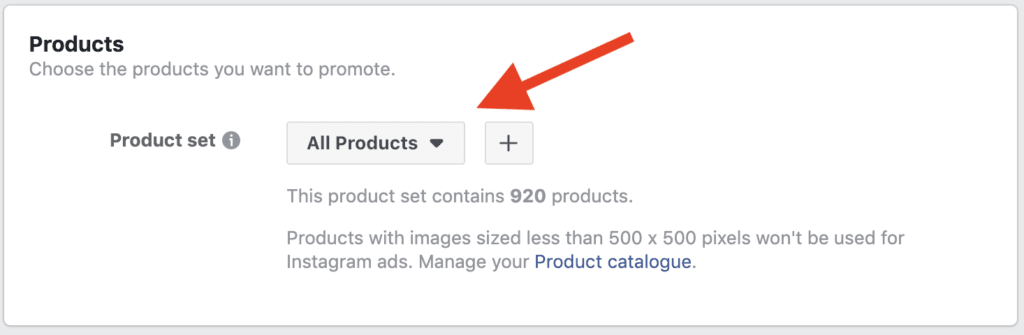
Now we’ve chosen the catalog, we need to specify the product set.

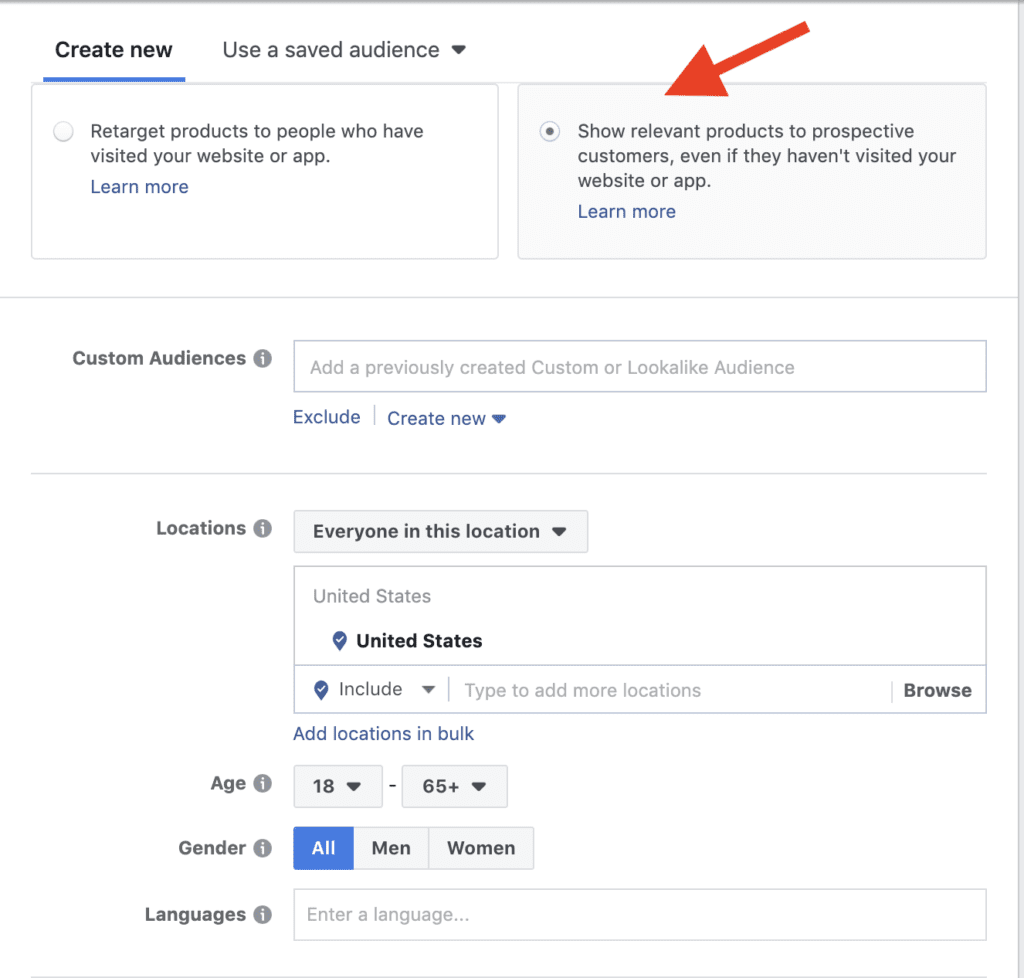
Now we can move on to audience selection, either retargeting people that have interacted with our website, or prospecting to cold traffic.
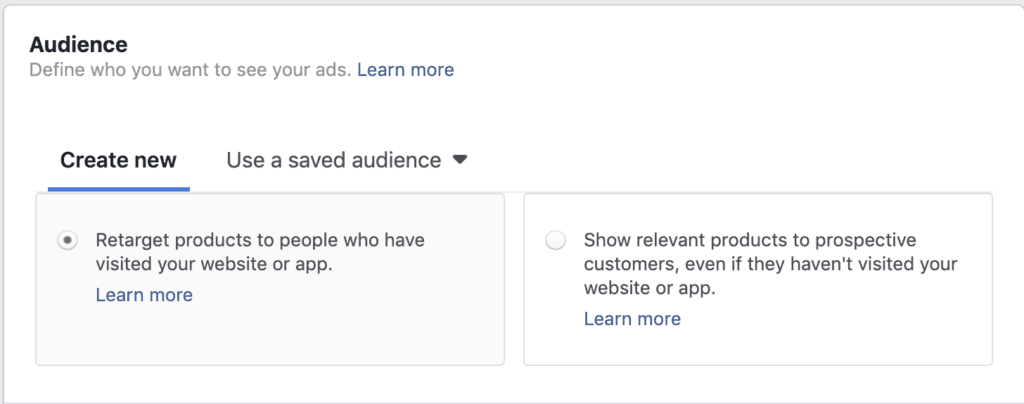

For retargeting, we can advertise to people that have viewed a product, or those that have taken the next step and added it to cart.
Choose the time window, for instance, do you want to show ads to people for a couple of days, a week or a month?

Up-sell is another retargeting option, where the user views products from one of your sets and then gets introduced to products in another set via ads.

The sales process doesn’t end after the first purchase. Now we have a chance to cross-sell by displaying accessories that complement the product that they’ve just purchased.

Moving on to broad targeting, these options are the same as for any other campaign type.
We suggest carefully researching your buyer personas and then creating product sets around this, so that even though the audience doesn’t know your brand yet you’re showing them products that they’re likely to find relevant.

Customizing The Ad
Composing a dynamic ad is a little different to a standard ad, but in a good way; the catalog is doing most of the work for you.
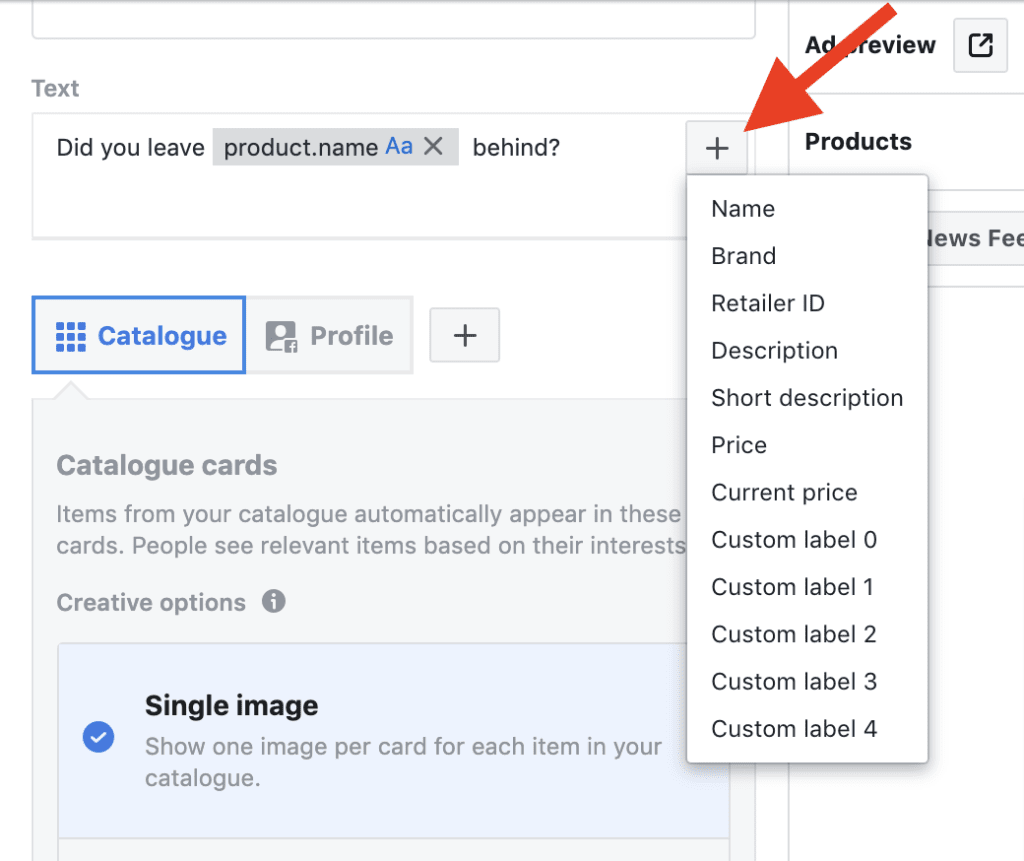
The most commonly used format is a carousel with an end card (the “profile” box in the screenshot below). The images are taken care of by the catalog, so that just leaves the headline, ad text and link description.
Use the “+” buttons to access dynamic placeholders, this is where text such as the brand, product name, description and price can be populated automatically from the catalog.

Customize The Image
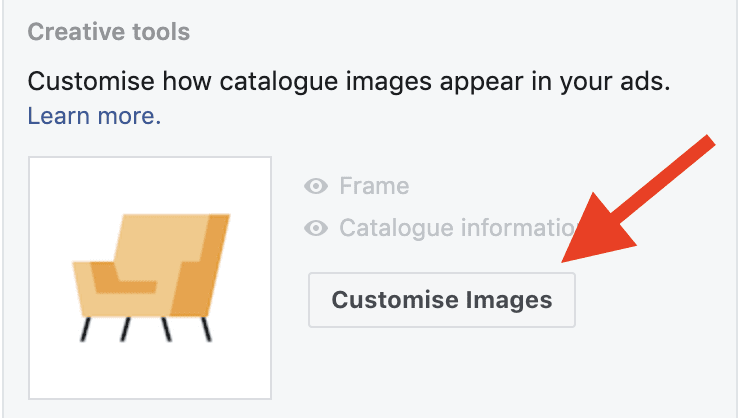
Although the images are populated from the catalog, there is some customization that we can apply: catalog information and frames.
Start by clicking the “customize images” panel when creating the ad.

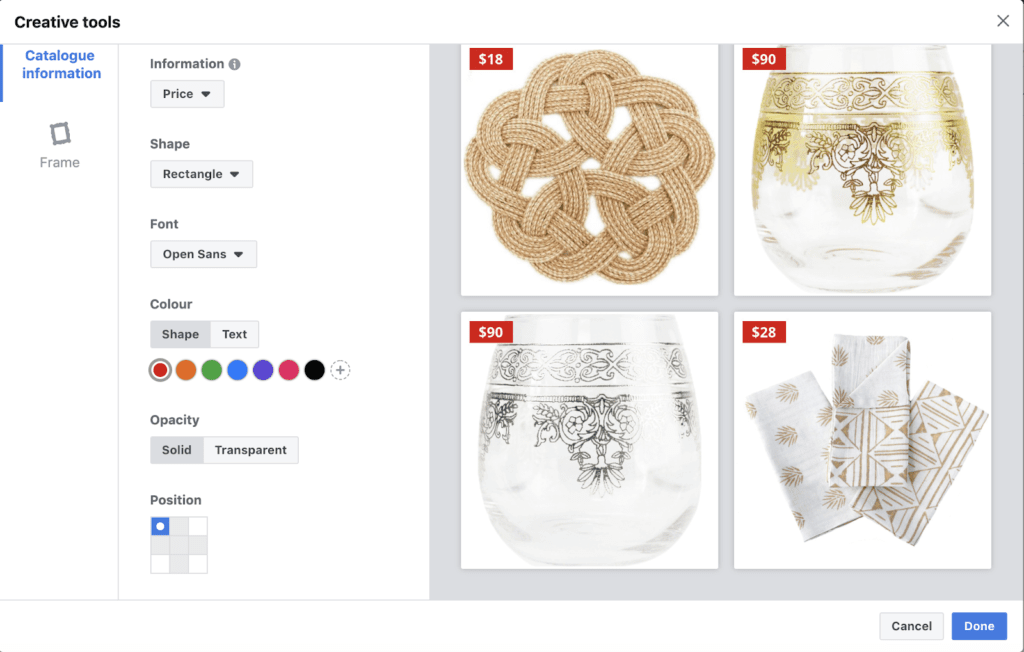
The catalog information option works in the same way as dynamic placeholders do for text, but in this case we’re creating dynamic overlays for the images.


In the example below, we’re adding the price to each image and can specify the color, positioning and shape of the text box and also the font.

If you want even more customization, you can add a frame as well.
A frame could include the brand logo, or could be themed for a seasonal promotion, for example a Christmas theme.
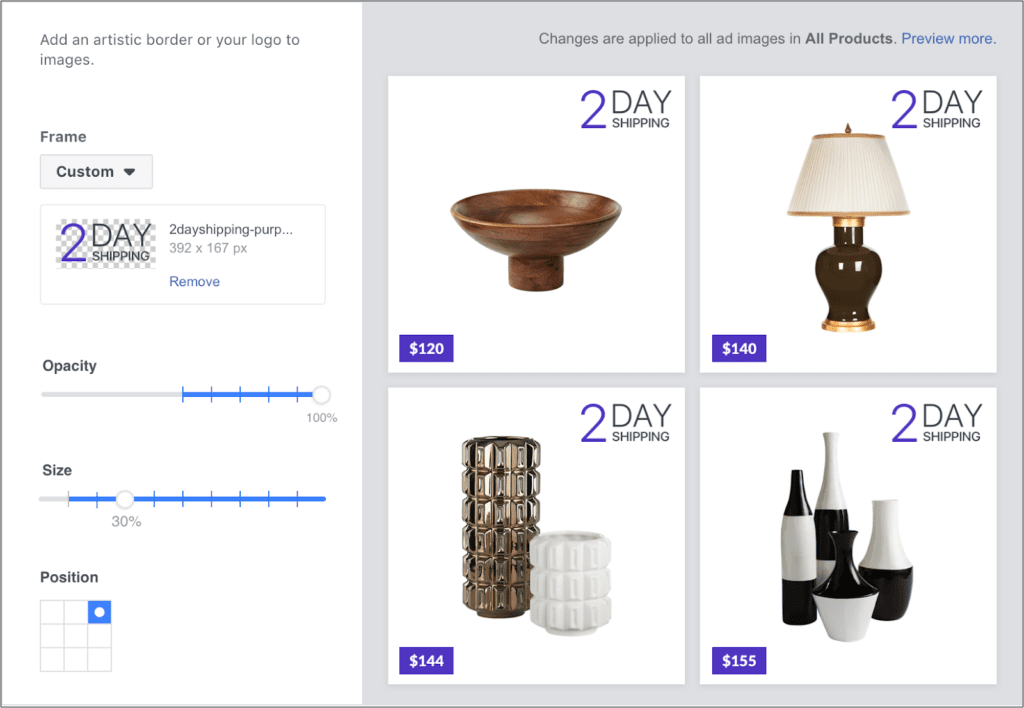

Always keep in mind that 93% of Facebook ads are viewed on mobile, so don’t make the graphics too cluttered. On small screens, ensure the product image is the star of the show.
Conclusion
You’ve got this!
We’ve covered a lot in this guide, and at this stage you might be thinking that setting up DPA’s is a lot of hard work, but we urge you to think again.
Let’s break it down into simple steps:
- Creating the product catalog is a one time process, no coding required
- Selecting the audience is just a couple of clicks
- Most of the ad creative is already provided from the catalog, so just add a couple of lines of text and you’re done
Once you’ve put in a small amount of effort to create the catalog, it’s plain sailing from there.
As the retargeting ads can generally be run on a “set it and forget it” basis as long as you keep an eye on the frequency, they can save you a lot of time as well as being effective.
If you have an eCommerce store with more than a dozen or so products, you definitely want to add Dynamic Product Ads to your marketing mix.