
Instagram Stories are an excellent way to engage with your followers, improve brand sentiment, and even drive traffic to your business website (formerly via swipe-up links and now through link stickers).
But with all the creative possibilities, posting Instagram Stories on a regular basis can be strenuous and time-consuming — especially if it’s a major part of your social media marketing strategy.


To reduce the time and effort that goes into posting Stories, you should consider scheduling them. (Yes, it is possible to create, edit, and schedule Instagram Stories ahead of time using Hootsuite or Meta Business Suite.)
In this article, we’ll go over two methods of scheduling Instagram Stories. We’ll also discuss the reasons why you should schedule Instagram Stories instead of publishing them on the go.
Is there an app for scheduling Instagram Stories?
Instagram doesn’t let you schedule Stories directly in the app. But you can use third-party tools like Hootsuite to schedule your Instagram Stories. It’s also possible to schedule Stories in advance using Meta’s desktop dashboard, Facebook Business Suite.
How to schedule Instagram Stories using Hootsuite
In general, third-party social media management tools can’t publish Stories directly to Instagram because of an API limitation. But don’t worry, there is a workaround you can use — we’ve outlined the details below.
Note: Before you begin, ensure that you’re using the latest versions of both the Instagram and Hootsuite apps. While you can create and schedule Instagram Stories on your desktop, you still need both mobile apps to finish the publishing process.
If you’d prefer to watch a video walkthrough, we’ve got you covered!
Step 1: Create your Instagram Story
- In the Hootsuite dashboard, click the drop-down arrow beside the green New Post button. Select New Story.
- In the Post to section, select the Instagram profile(s) you want to publish the Story on.
- Drag and drop up to 10 photos and videos for your Story into the Media section. If you don’t want to drag and drop, click Select files to upload. Or click Open Media Library to create an Instagram Story with free stock images or images from your Enterprise content library. Each image file should be 5MB in size (maximum) and videos can last up to one minute. You can always switch up the order in which your images and videos appear in your Story. Just drag and drop them in the correct order on the left side of your dashboard.
- Click Edit Image under each file to make edits to your Story assets vis Hootsuite’s image editor.
- Navigate to the Transform menu and click Story under Instagram to crop your image to your desired size.
- Use filters and the Adjust and Focus tools to further edit your Story assets.
- Use stickers, frames, the brush tool, and overlay text to give your Stories some character. Don’t forget that stickers and text are not clickable in Stories.
Hashtags, links, and other interactive elements are clickable, and you’ll apply them in a later step. When you’re done, click Save.

Step 2: Preview your Story and add interactive elements
- Check your Story components and ensure that your Story looks great with the preview pane.
- To add hashtags, links, or other interactive components to your Story, type them in the Clipboard text box. This will store the text so that you can copy and paste it when you’re concluding this process in the Instagram app.
- Click the bell icon to set up mobile notifications. You only have to do this the first time you’re scheduling a Story.
Step 3: Schedule your Story
- Click Schedule for later.
- Select the date and time you want the Story to go live and click Done.
- Click the green Schedule button to schedule your Story.
Step 4: Finalize and publish your Story
When it’s time for your Story to go live, the Hootsuite app will send you a push notification. Once you receive it, follow these steps to publish your Story.
- Click on the notification to open a preview of your Story. Then select Open in Instagram to open the Instagram app. Note: The Story will post to the Instagram account that is signed in. If you have more than one Instagram account, ensure that you’re logged into the right one.
- In the app, click on the camera icon in the top-left corner of the screen. Then click on the gallery icon in the bottom-right. All the photos and videos you made for your Story will show up as the most recent items in your camera roll.
- If your Story has multiple images and videos, click on Select Multiple. Then select all your Story components and click Next. If your Story has just one image or video, just click on that item.
- Now, you can add interactive elements to your Story. Since all the links, hashtags, etc. that you entered in Hootsuite have been copied to your clipboard, you can just paste them into the right location. For instance, to add your hashtag text, just open a text box or hashtag sticker, tap and hold, and select Paste to paste your text.
- To make further edits to your Story assets, you can use Instagram’s filters, stickers, and drawing tools. When you’re done, click Send To. Note: Look at the profile picture to double-check that you’re publishing the Story to the right Instagram account.
- Click Share next to Your Story to publish your story.
To learn more about the process of publishing Instagram Stories with Hootsuite, watch this video:
https://www.youtube.com/watch?v=kr0bRKOkUY0
Note: Scheduling Instagram Stories on Hootsuite is available to Pro, Team, and Enterprise plan users.
How to schedule Instagram Stories using Facebook Business Suite
If you have an Instagram Business account, you can use Meta’s native Business Suite to create and schedule Instagram Stories.
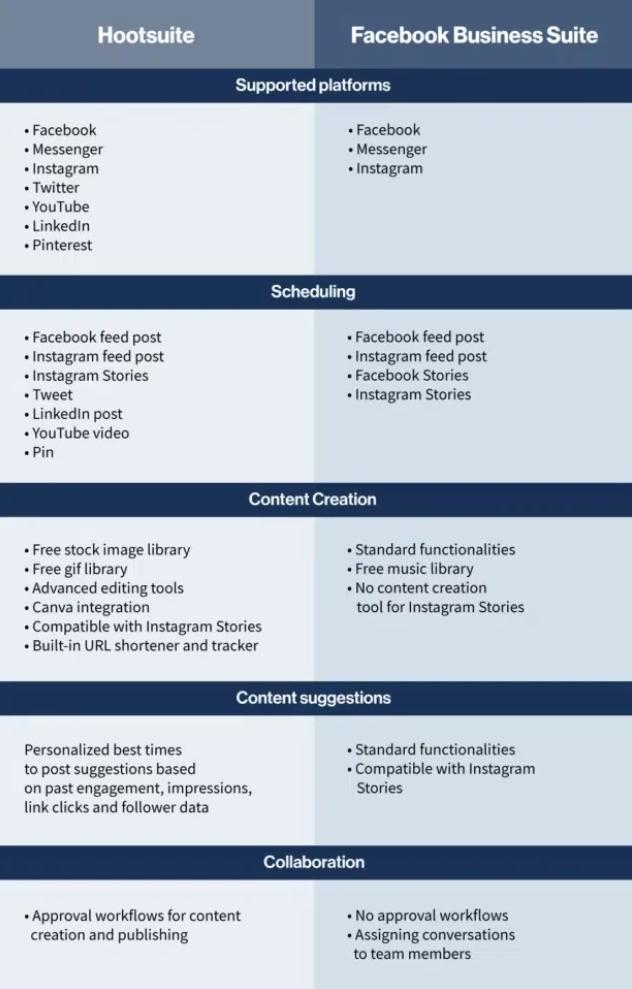
Meta Business Suite is a great tool to use if you’re only posting to Facebook and Instagram. But if you’re using other social media networks, you’ll be able to save more time and energy using a social media management tool that lets you handle all your social channels from one intuitive dashboard.
A social media management tool like Hootsuite will enable you to schedule content to major social networks like Facebook, Twitter, Instagram, TikTok, LinkedIn, Pinterest, and YouTube from one place. Here’s a comparison between Hootsuite and Business Suite:
If you decide to schedule your Instagram Stories with Meta Business Suite, log into your account and follow these steps:
Step 1: Go to Meta Business Suite
Visit your Facebook page and pick Business Suite from the menu on the left side of the screen. When you get in, select your account from the drop-down menu in the top-left corner of the dashboard.
Step 2: Start creating your Story
You can start crafting your Story from three sections in the dashboard:
- the Create Post button in the menu on the left side of the screen
- the Posts and Stories item in the left side of the screen
- the Create Story button in the center of the dashboard
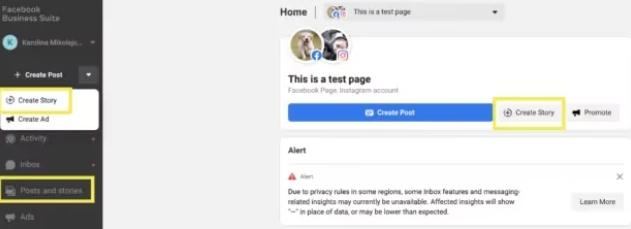
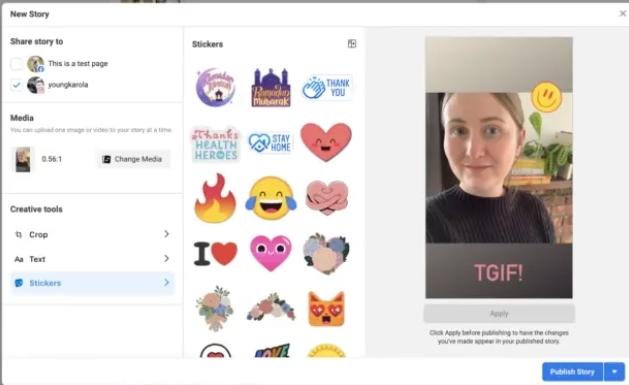
When you click on any of these options, a Story creator window will popup. In the window, select the account you want to publish your Story on, and upload a photo or video to start making your Story.
The editing options in Business Suite are limited compared to the ones in Hootsuite or the Instagram app. In the Business Suite, you can only crop your media file, and add stickers and text.
Step 3: Schedule your Instagram Story
When you’re done crafting your Story, tap the arrow beside the Publish Story button to see scheduling options. Tap Schedule Story, and pick a date and time to post your Story.
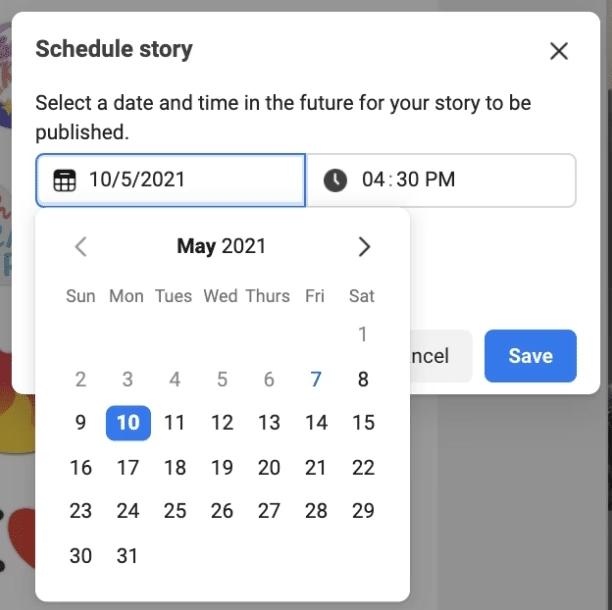
After saving the date and time, click Schedule Story, and that’s it! The Story will be automatically posted at the time you selected.
Navigate to Posts and Stories. Click Stories and Scheduled to confirm that your Story has been scheduled.
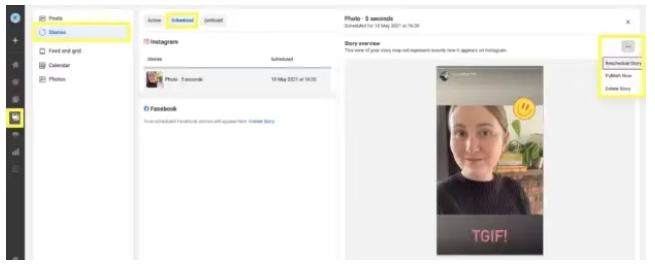
In this area, you can manage your Story — publish it immediately, reschedule it or delete it from your lineup.
6 reasons to schedule Instagram Stories
1. It saves time
Scheduling Instagram Stories helps free up time for you to do other things that drive real results, like crafting your next social media campaign or engaging with your audience.
Instead of ideating, creating, and posting Stories repeatedly every day, you can give yourself a few hours to prepare and schedule all your Stories for the week in one go.
When the time comes for your scheduled Stories to go live, you can publish them with a few clicks. You can also mix live Stories with your scheduled ones if you want to give your audience updates on something happening in real-time.
2. You can upload Instagram Stories from your desktop or laptop
When creating and publishing Stories with a smartphone, you can easily get confused about the right order of the photos and videos that make up a particular Story.
But when you use a third-party tool or Meta Business Suite to schedule Stories, you can upload your Story files directly from your computer. When the Story is about to go live, the components will automatically appear in the right order at the top of your camera roll.
3. There are more editing options
When you use Hootsuite to schedule Instagram Stories, you get access to all the in-built editing tools in the Hootsuite dashboard. These editing tools can help you get creative with fonts, frames, and stickers that are not available in the Instagram app. You can even use your own stickers to create unique-looking Stories.
Because you’re doing this with a desktop or laptop computer, you’ll have better creative control over your Stories.
4. You can build a consistent brand aesthetic with Instagram templates
Instagram templates are a great resource to create Story posts that align with your brand’s overall aesthetic. They’re especially useful when you’re posting non-visual content like quotes, texts, or blog post links.
The problem is that most Instagram templates require you to use software like Adobe Photoshop to craft your Instagram posts. And the process of transferring your finished posts from Photoshop to your phone for publishing can be tedious.
Uploading your Stories directly from your computer makes it a lot easier to work with Instagram templates. This means that you’ll be able to use templates for your Story posts.
If you’re new to Instagram templates, check out this Hootsuite post on how to use them (and get some free Instagram Stories templates to get you started).
5. You’ll avoid typos and broken links
Typing the text that you’ll publish alongside your Stories with your thumbs can cause you to make mistakes, especially when autocorrect is in the mix.
Scheduling your posts ahead of time gives you the time to plan your social text and links. Type your captions on an actual keyboard. Proofread them with a spelling and grammar check app. Check the other posts that people are sharing for the Instagram hashtags you want to use.
You can even save your work in Drafts and come back later to look through it again with a fresh perspective. You could even get a pal to take a look. That can’t really happen if you’re posting on the fly.
6. It’s a way to encourage engagement
When you’re familiar with scheduling Instagram Stories, you’ll start posting more Stories, more consistently.
When your audience knows the kind of content you post and when you post it, they’re more likely to watch your Stories and interact with them.
If you’re ready to save time by scheduling Instagram Stories, check out Hootsuite. You’ll be able to work on your Stories and manage your Story assets from a single, intuitive dashboard. Try Hootsuite for free today.